레이블이 WIZwiki_W7500인 게시물을 표시합니다. 모든 게시물 표시

2015년 9월 22일 화요일

How to collect and analyze sensing data of IoT platform

How to collect and analyze sensing data of IoT platform

This post shows how to connect IoT platform to Cloud service and how to display sensing data for graphical analysis.

data.sparkfun.com

  • What is Phant?

    • Phant is a open source cloud server platform by powered Sparkfun Electronics.
    • Sparkfun created data.spartfun.com ,which is a free cloud service running phant. -
    • To collect data from your device to cloud service, you just need to register a new stream.
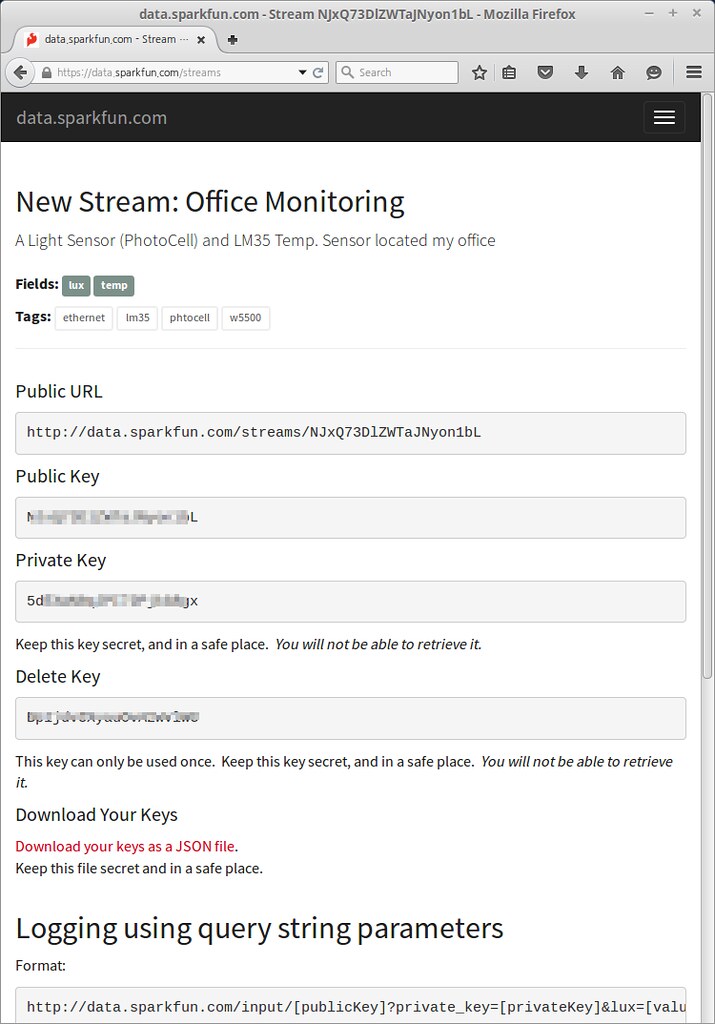
    • After register, you get two keys for accessing the data; one is q private key is required to update that stream, other is a public key grants access to any other stream on the service.
    • All communication with Phant is carried out over HTTP. So, your device should be acted as HTTP Client.
    • http://data.sparkfun.com/input/[publicKey]?private_key=[privateKey]&[field1]=[value]&[field2]=[value]
      
  • Phant : Phant.io

    Phant is a modular node.js based data logging tool for collecting data from the Internet of Things. It is the open source software that powers data.sparkfun.com, and is actively maintained by SparkFun Electronics. Phant is short for elephant. Elephants are known for their remarkable recall ability, so it seemed appropriate to name a data logging project in honor of an animal that never forgets.

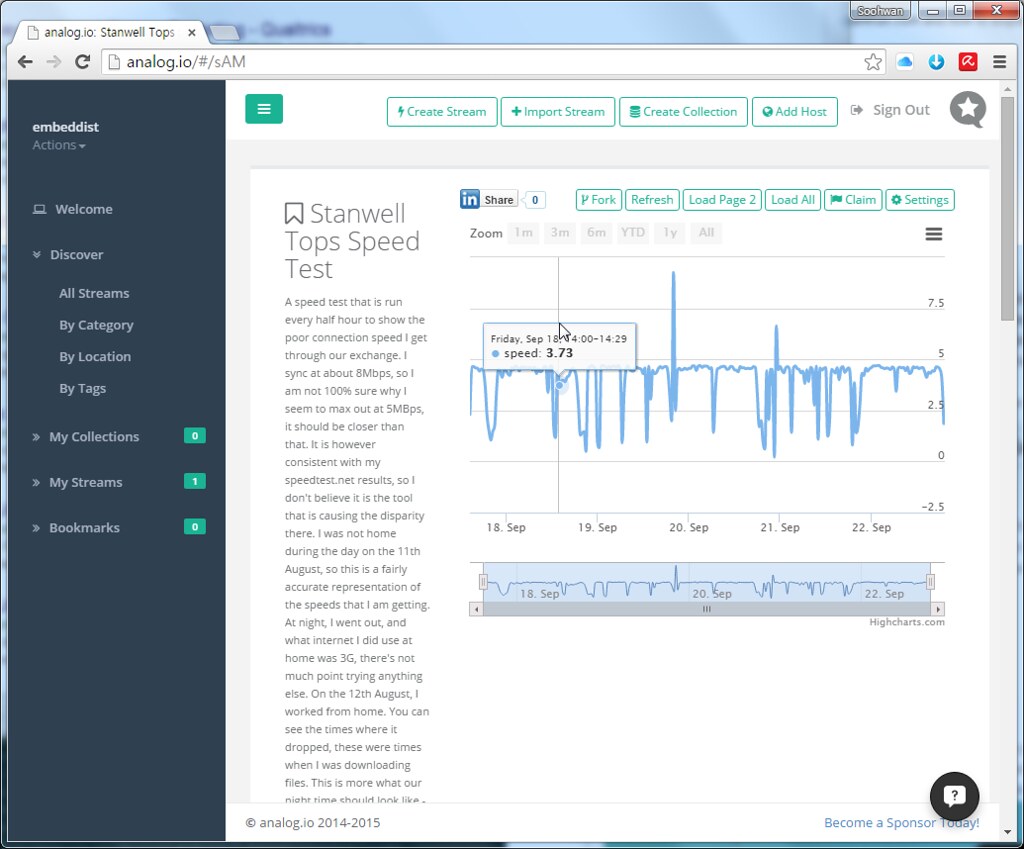
analog.io

  • 3rd party of data.sparkfun.com
  • Graphing front end

    analog.io is a full stack IoT web service and hardware platforms where people can create connected devices and share them with the world. It is designed to solve all kinds of world problems from air pollution, improving farm output or studying the bee population. It is really only limited by the users imagination. (for more detail)
    2015-09-22_19-36-25

Prepare materials

  • Hardware
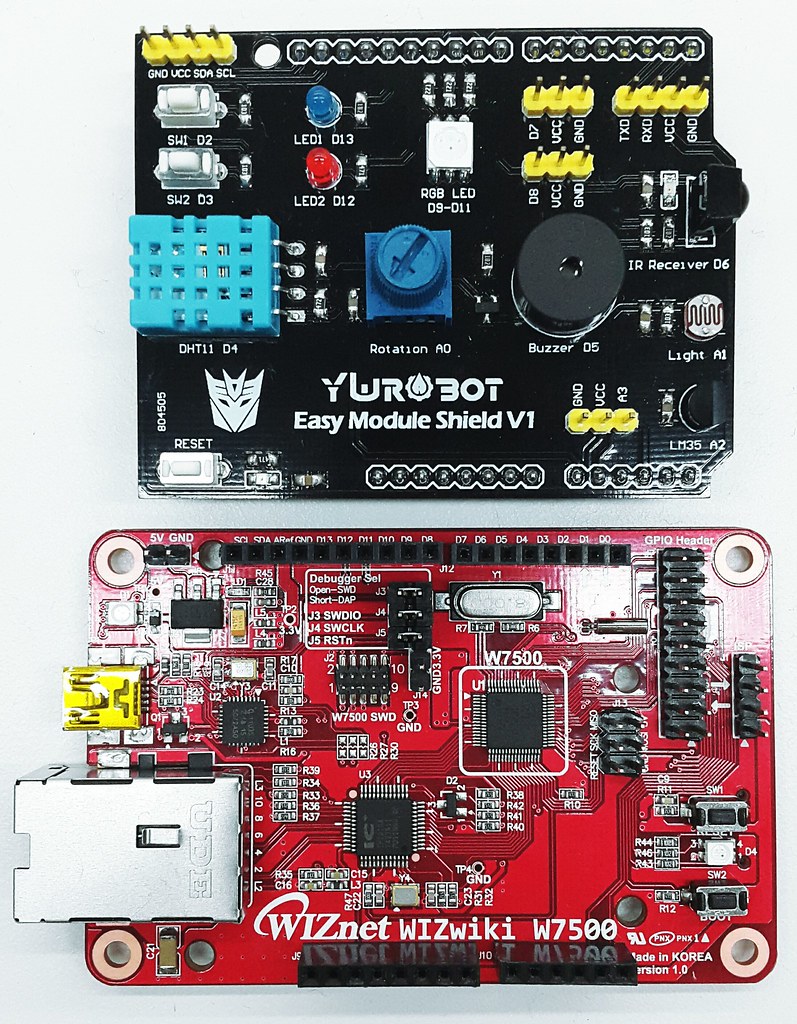
    IMG_20150922_195307

    • mbed platform : WIZwiki-W7500

      • ARM® Cortex™-M0 Core 48MHz
      • 128KB Flash memory
      • 16KB to 48 KB SRAM (Min 16KB available if 32KB socket buffer is used, Max 48KB available if no socket buffer is used)
      • Hardwired TCP/IP Core (8 Sockets, MII: Medium-Independent Interface)
      • 12-bit, 8ch ADC
      • 53 I/Os
      • 1ch Watchdog, 4ch Timers and 8ch PWM
      • 3ch UART
      • 2ch SPI
      • 2ch I2C
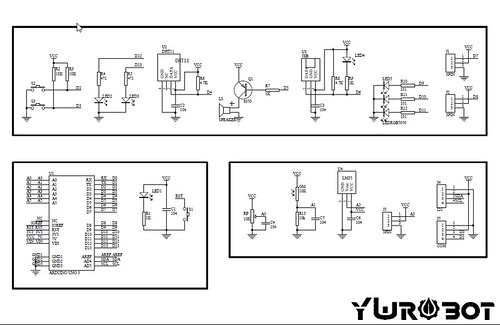
    • Sensors (ywrobot easy module shield v1): DHT11
      ywrobot

  • Registrations

    • data.sparkfun.com
      To create a data stream, head over to data.sparkfun.com, and click “CREATE”.

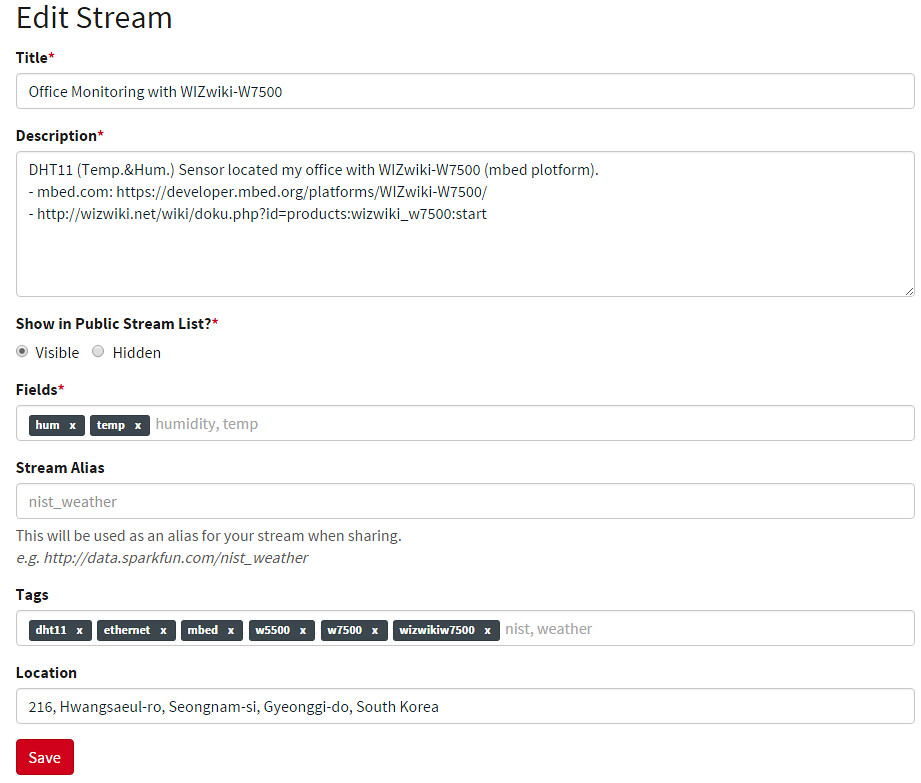
      • Create a Data Stream

        2015-09-22_20-06-54

          * Fields - This comma-separated list of words defines data stream to post a list of unique values.
          * Stream Alias - This testbox defines domain name for you Data Stream
        
      • New Stream example: After creating a data Stream, you will confirm URL, Keys for accessing for your data stream.
        E_New Stream1

Software

2015-09-22_20-28-32

  • Used Lib
    • WIZnetInterface Lib. : for Ethernet connectivity of W7500
    • DHT Lib. : for DHT11 sensor

Codes flow

  • mbed.org repositories : https://developer.mbed.org/users/embeddist/code/Data_Sparkfun_io/

  • Configuration Arduino’s I/O pins

    /*
    *Input Pins, Misc
    * D4 - Temp. and Hum. Sensor
    * D3 - Push buttom
    */
    DHT sensor(D4, DHT11);
    DigitalIn  triggerPin(D3);
    
  • Configuration Phat Stuff

    /*
    * Phant Stuffs
    * Insert your publicKey
    * Insert your privateKey
    * Generat Fileds; 'Files name shoud be same "field name" in Create Stream form'
    */
    char publicKey[] = "insert_your_publicKey";
    char privateKey[] = "insert_your_privateKey";
    uint8_t NUM_FIELDS = 2;
    char fieldNames1[] = "hum";
    char fieldNames2[] = "temp";
    
  • Network Configuration : DHCP Client

     // Enter a MAC address for your controller below.
      uint8_t mac_addr[6] = {0x00, 0x08, 0xDC, 0x00, 0x01, 0x02};     
    
      printf("initializing Ethernet\r\n");
      // initializing MAC address
      eth.init(mac_addr);
    
      // Check Ethenret Link
      if(eth.link() == true)   printf("- Ethernet PHY Link-Done \r\n");
      else printf("- Ethernet PHY Link- Fail\r\n");
    
      // Start Ethernet connecting: Trying to get an IP address using DHCP
      if (eth.connect()<0)    printf("Fail - Ethernet Connecing");
    
      // Print your local IP address:
      printf("IP=%s\n\r",eth.getIPAddress());
      printf("MASK=%s\n\r",eth.getNetworkMask());
      printf("GW=%s\n\r",eth.getGateway());
    
  • HTTP Client

    /*
    *    - If the trigger pin (3) goes low, send the data.
    *        - Get sensing datas by using analogread()
    *        - Call postData
    *            - Open socket as TCP Client
    *            - Try to connet TCP server (data.sparkfun.com); if needs, do DNS clinet for getting IP address of server
    *            - Make query string based on Phant frame
    *            - Send query
    *            - Check for a response from the server, and route it out the serial port.
    */
    
      while(1)
      {
          if(triggerPin ==0)
          {
              sensor.readData();
              c   = sensor.ReadTemperature(CELCIUS);
              h   = sensor.ReadHumidity();
             printf("Temperature in Celcius: %4.2f", c);
             printf("Humidity is %4.2f\n", h, dp, dpf);
    
            sock.connect("data.sparkfun.com", 80);
    
            snprintf(http_cmd, http_cmd_sz,  "GET /input/%s?private_key=%s&%s=%2.2f&%s=%3.3f HTTP/1.1\r\nHost: data.sparkfun.com\r\nConection: close\r\n\r\n", 
                                              publicKey, privateKey, fieldNames1, h, fieldNames2, c);
            sock.send_all(http_cmd, http_cmd_sz-1);
    
            while ( (returnCode = sock.receive(buffer, buffer_sz-1)) > 0)
            {
                buffer[returnCode] = '\0';
                printf("Received %d chars from server:\n\r%s\n", returnCode, buffer);
            }
    
            sock.close();         
          }
    
          wait(2);
      }
    
  • Make Query string over HTTP

      http://data.sparkfun.com/input/[publicKey]?private_key=[privateKey]&hum=[value]&temp=[value]
    
      snprintf(http_cmd, http_cmd_sz,  "GET /input/%s?private_key=%s&%s=%2.2f&%s=%3.3f HTTP/1.1\r\nHost: data.sparkfun.com\r\nConection: close\r\n\r\n", publicKey, privateKey, fieldNames1, h, fieldNames2, c);
      sock.send_all(http_cmd, http_cmd_sz-1);
    

Demo

Serial Monitor

  1. DHCP Clinet message
  2. Press the button to send query to server.
  3. Confirm the response message on serial terminal and data.spark.com/your_stream

     initializing Ethernet
     - Ethernet PHY Link-Done
     IP=192.168.11.224
     MASK=255.255.255.0
     GW=192.168.11.1
     Temperature in Celcius: 27.00Humidity is 55.00
     Received 299 chars from server:
     HTTP/1.1 200 OK
     Access-Control-Allow-Origin: *
     Access-Control-Allow-Methods: GET,POST,DELETE
     Access-Control-Allow-Headers: X-Requested-With, Phant-Private-Key
     Content-Type: text/plain
     X-Rate-Limit-Limit: 300
     X-Rate-Limit-Remaining: 298
     X-Rate-Limit-Reset: 1441353380.898
     Date: Fri, 04 Sep 20
     Received 299 chars from server:
     15 07:46:03 GMT
     Transfer-Encoding: chunked
     Set-Cookie: SERVERID=phantworker2; path=/
     Cache-control: private
    

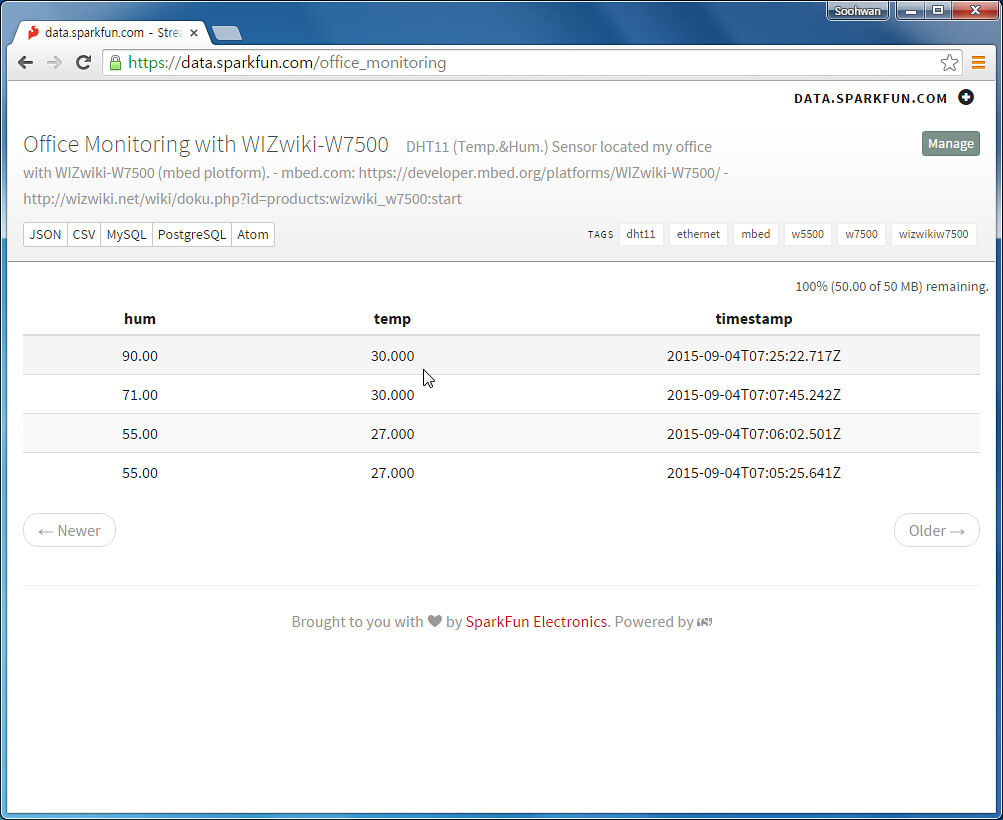
https://data.sparkfun.com/office_monitoring

2015-09-04_16-39-51

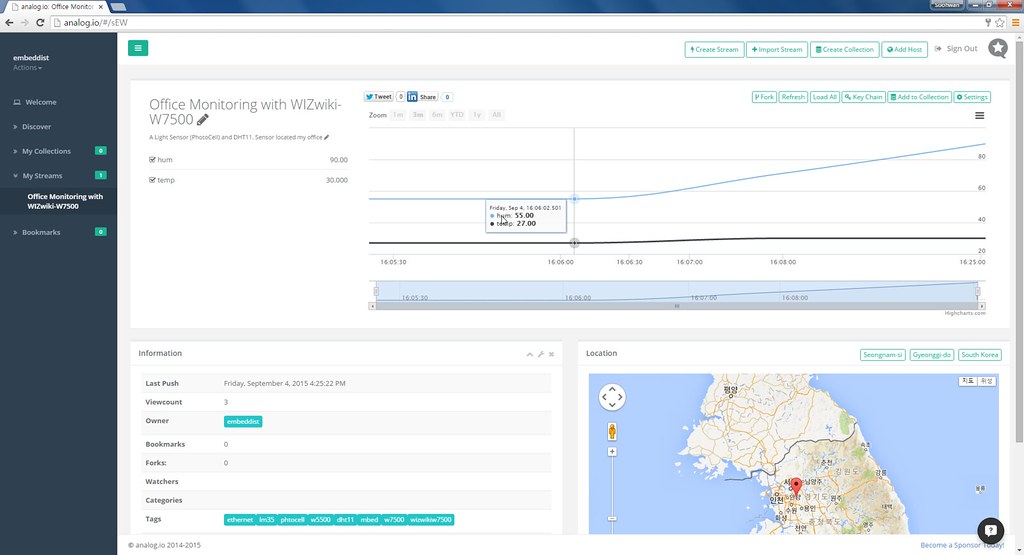
analog.io: import stream from data.sparkfun.com/your_stream

  • How to Import Stream

    1. Click ‘+Import Stream’ button on menu
      2015-09-04_16-38-19

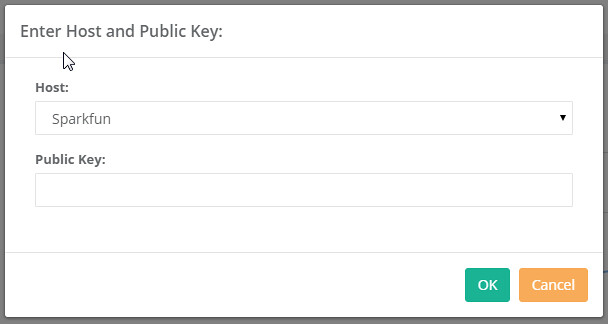
    2. Select ‘Sparkfun’ on Host drop box and input Public key of data.sparkfun.com
      2015-09-04_16-38-36

    3. Confirm your Stream
      2015-09-04_16-36-04

2015년 7월 5일 일요일

DHCPAddressPrinter

DHCPAddressPrinter

Dynamic Host Configuration Protocol

DHCP의 자세한 내용은 아래의 링크를 참조한다.
Wikipedia:Dynamic Host Configuration Protocol

DHCP를 사용할때 필요한 개념들을 정성적으로 이해하고 실제로 Router(DHCP Server)와 ARMmbed Platform(DHCP Client)의 관계를 알아보자. 또한, 궁극적으로 ARMmbed Platform의 WIZnetInterface에서 어떻게 DHCP를 설정하고 사용하는 지 초점을 맞춘다.

DHCP 왜 사용하나?

  • Dynamic Host Configuration Protocol의 정의 처럼 동적으로 Host의 IP address를 설정하여 사용할 수 있도록한다.
  • 목적은 Network상에서 Network Administrator 과 일반 Network User가 manual로 설정을 줄이는 것이다.

우리가 일상생활에서 흔히 경험하는 가장 쉬운 예로 들어보자. Smart phone을 유무선공유기(Access Point)에 접속할때 AP의 SSID선택하고 Password 입력하면 “IP를 받아오는 중”이라는 는 문구를 볼 수 있다. 이것은 Smart Phone(DHCP Client)이 AP(DHCP Server)로 부터 IP address 할당 받는 것을 뜻한다.

우리는 DHCP server 부터 할당 받은 IP address가 무엇인지, 할당 받은 IP address를 언제까지 사용할 수 있는지 등과 같은 것들을 생각하지 않아도 된다. 이것이 DHCP를 사용하는 이유이다.

단지, 이때 주의해야 할 것은 AP가 WAN (Wide Area Network) Port로의 설정이 Internet이 가능하도록 설정되어 있냐는 것이다. AP로 부터 IP address를 할당받았으나 Google이나 Naver의 접속이 안되는 경우 즉, Internet이 안 될때가 이 경우이다. 이것을 이해하려면 공유기의 NAT기능을 알아야 한다.

  • Network Address Translation (NAT)
    일반적으로 공유기 NAT 기능을 지원한다. NAT는 Local network IP address와 Internet IP address를 Translation해주는 기능이다. 아래의 그림과 같이 NAT(공유기)는 DHCP server로 동작하여 Local network에 있는 모든 Host들에 대해 DHCP IP address를 할당한다. 그리고 NAT가 Internet Service Provider(ISP, 쉽게말해 KT, U+)로 부터 IP address를 할당 받았다면, 이 해당 NAT는 인터넷에 접속이 가능하다. 다시말하면, NAT에 연결된 모든 Host들은 Internet에 접속 할 수 있다.

    출처: http://www.h3c.com/portal/res/200808/06/20080806_659082_image001_613642_57_0.gif
    NAT의 구체적인 원리는 위의 그림에서 NAT table을 이해하면 좀 더 쉽게 알 수 있다. 이 NAT table은 Host(10.1.1.100:8)이 연결되어 있으며 외부의 Server(211.100.7.34:24)로 접속을 한 경우를 보여준다. Host는 DHCP IP address를 할당받아 Server에 자신의 Local IP address로 접속 할 수가 없다. 이때 Host는 NAT의 IP transtation기능을 이용하여 NAT의 IP address (162.105.178.65)를로 외부의 (WAN/Internet)에 연결되어 있는 Server에 접속이 가능해진다. 반대로 Server입장에서는 Host의 IP Address는 알 수 없고 NAT의 IP address만 인식할 수 있다.

How to use DHCP in WIZnetInterface ?

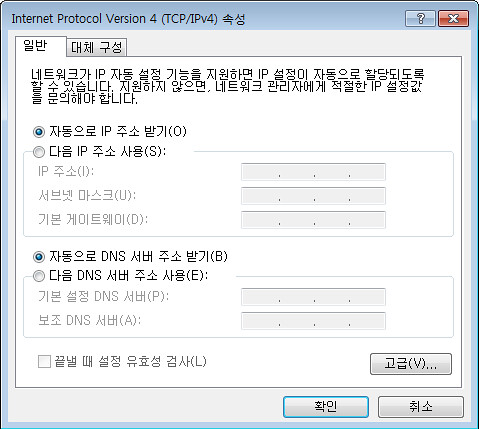
  • OS기반의 PC에서 DHCP를 설정한다면 아래와 같이 아주 간단하게 설정 할 수 있다.
      PC상에서 DHCP를 설정하기 일반적으로  WINDOWS를 쓴다면 아래의 그림과 같이 **제어판>>네트워크 및 인터넷>>네트워크 및 공유 센터>>로컬영역연열>>로컬영역상태>>속성>>Internet Protocol Version 4(TCP/IP속성)**에서 '자동으로 IP 주소 받기'를 클릭한다. 끝!
    
    2015-07-02_14-41-34

하지만, Embedded System의 경우 일일이 Developer가 설정해야 한다.

  • 이제부터 WIZnetInterface의 DHCP Client를 사용해보자
    • 준비단계
      • Network 구축: 공유기의 DHCP Server기능을 활성화하고 해당 공유기에 Target board(WIZwiki_W7500)와 PC를 연결한다.
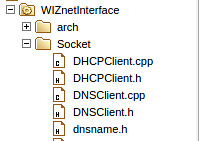
      • DHCPClient코드/Library: WIZnetInterface에 DHCPClient Library를 포함하고 있다.
        dhcpdns

Do DHCPAddressPrinter

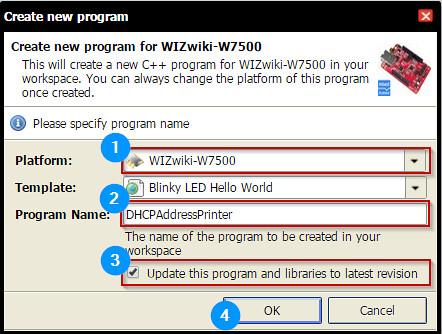
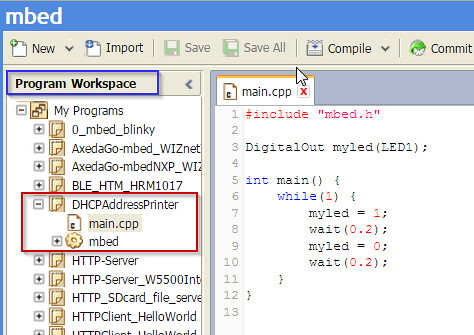
  1. Create New Program as DHCPAddressPrinter
    2015-07-03_09-35-41
  2. Confirm the created program (mbed: mbed.lib, main.c:blinky_led)
    2015-07-03_09-49-33
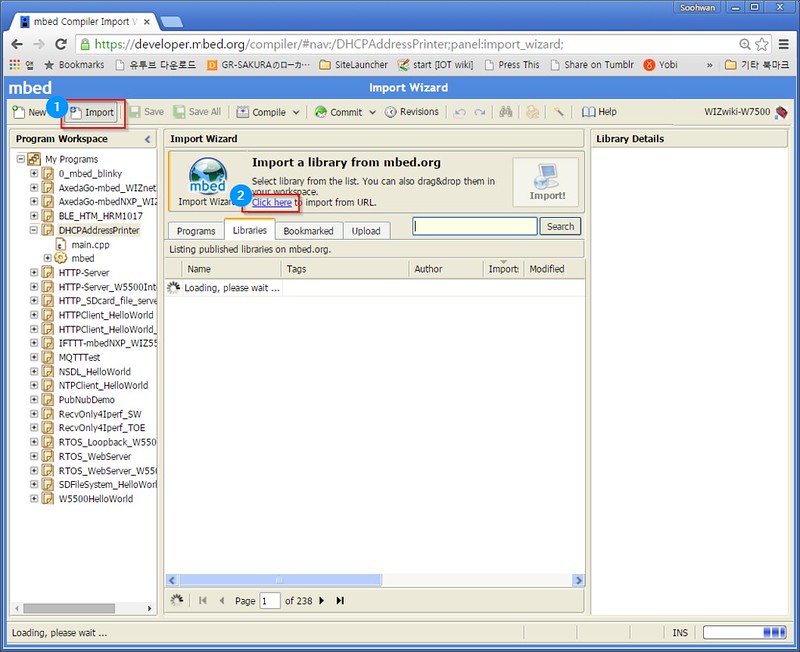
  3. Import WIZnetInterface by using Import Wizard:”https://developer.mbed.org/teams/WIZnet/code/WIZnetInterface/"(1)
    2015-07-03_09-51-36
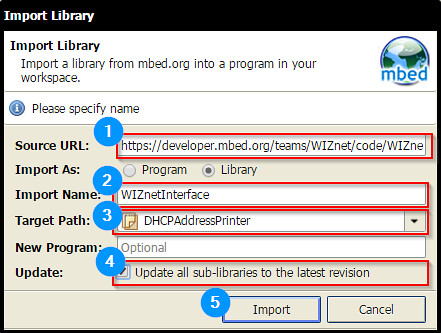
  4. Set Import Library
    2015-07-03_09-56-16
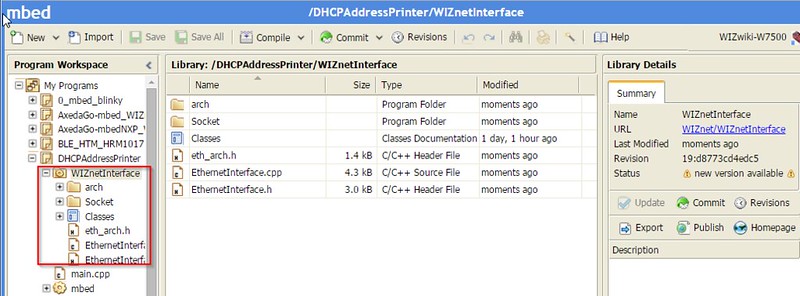
  5. Confirm the imported WIZnetInterface library
    2015-07-03_09-57-27
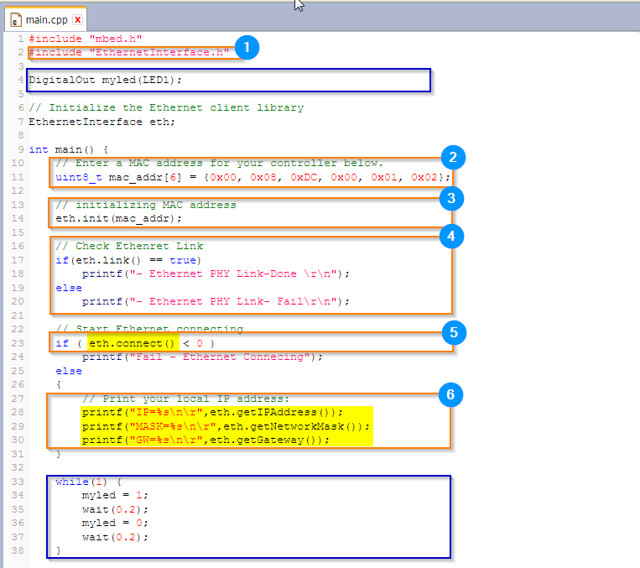
  6. Make Codes
    2015-07-03_10-32-05
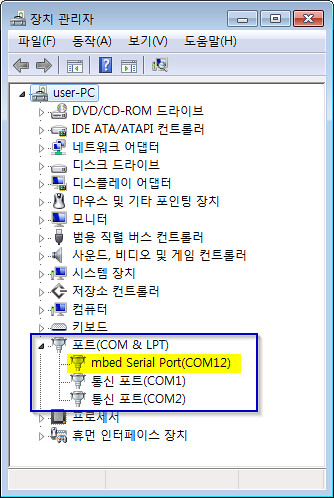
  7. Confirm COM port for mbed platform
    2015-07-03_10-49-53
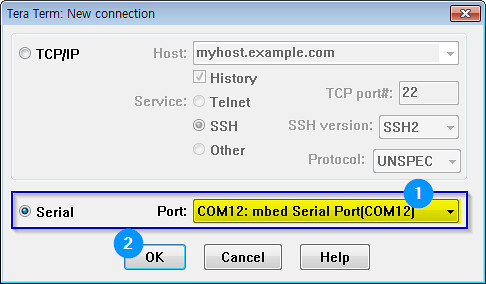
  8. Set serial port for teraterm
    2015-07-03_10-51-10
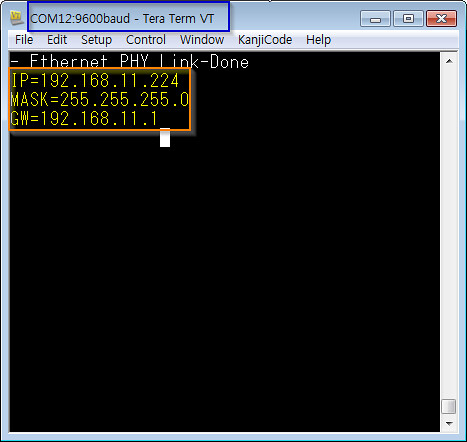
  9. Display the IP address allocated from DHCP server
    2015-07-03_10-51-54
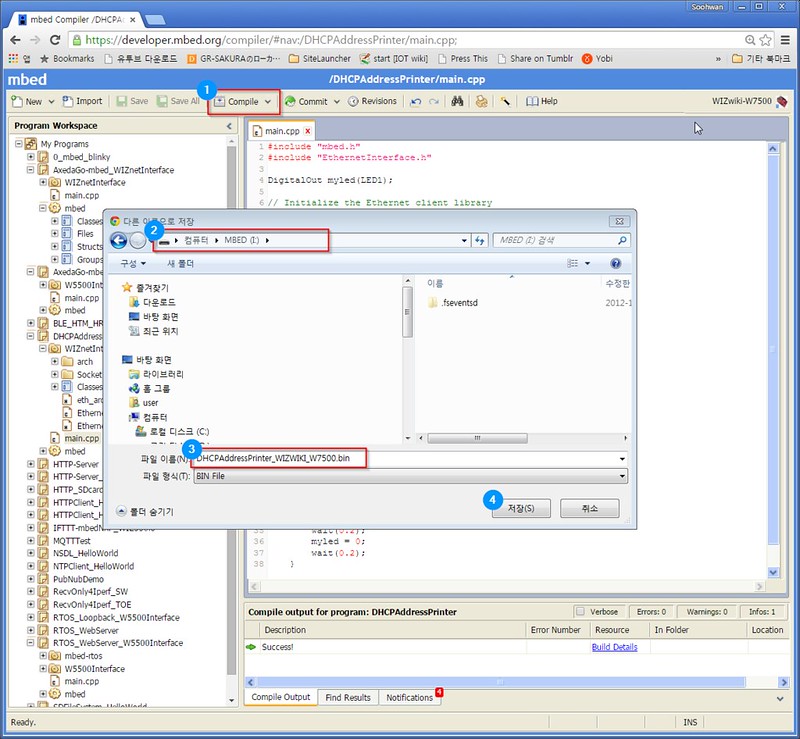
  10. Download bin files from WebIDE
    2015-07-03_10-54-44

Code Repository on ARMmbed

http://developer.mbed.org/users/embeddist/code/DHCPAddressPrinter/

Code

#include "mbed.h"
#include "EthernetInterface.h"

DigitalOut myled(LED1);

// Initialize the Ethernet client library
EthernetInterface eth;

int main() {
    // Enter a MAC address for your controller below.
    uint8_t mac_addr[6] = {0x00, 0x08, 0xDC, 0x00, 0x01, 0x02}; 

    // initializing MAC address
    eth.init(mac_addr);

    // Check Ethenret Link
    if(eth.link() == true)
        printf("- Ethernet PHY Link-Done \r\n");
    else
        printf("- Ethernet PHY Link- Fail\r\n");

    // Start Ethernet connecting
    if ( eth.connect() < 0 )
        printf("Fail - Ethernet Connecing");
    else
    {
        // Print your local IP address:
        printf("IP=%s\n\r",eth.getIPAddress());
        printf("MASK=%s\n\r",eth.getNetworkMask());
        printf("GW=%s\n\r",eth.getGateway());
    }        

    while(1) {
        myled = 1;
        wait(0.2);
        myled = 0;
        wait(0.2);
    }
}

2015년 7월 1일 수요일

ARMmbed WIZnetInterface

WIZnetInterface

WIZnet Ethernet Interface using Hardware TCP/IP chip, W5500 and TCP/IP Offload Engine, W7500.
Users » embeddist » Code » WIZnetInterface

WIZnetInterface ?

  • EthernetInterface in ARM mbed
    mbed.org는 Handbook>>Ethernet에 ARM mbed platform들이 Internet에 Connecting하기 위한 Network Library인 EthernetInterface를 제공하고 있다. EthernetInterface는 TCP/IP Software stack으로 lwIP을 채택하고 있다.
  • WIZnet TCP/IP Offload Engine
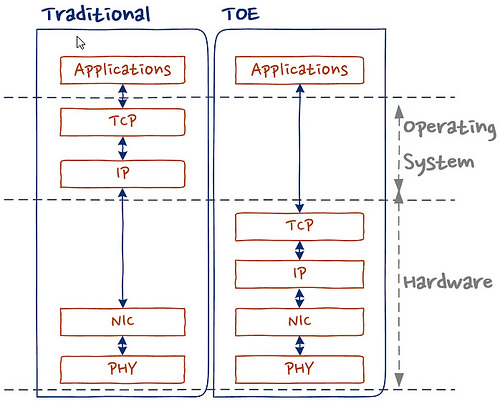
    아래의 그림과 같이 TOE는 TCP이하의 Network Layer가 Hardware적으로 설계되어 있어 Operating System과 Microcontroller의 Networking을 위한 리소스와 메모리를 최소화 해준다. 따라서, 리소스가 제한되는 Low-end IoT Device에서 TOE의 기능이 탑재한 MCU혹은 TOE를 채택한 System은 보다 Networking 이외의 기능들에 최적화 시킬 수 있다.
    TCP/IP Offload Engine
  • 과연, ARM mbed에서 이러한 TOE를 적용한 Platform혹은 Components 있나?
    있습니다. 있고요.
    Platform으로는 W7500이 적용된 WIZwiki_W7500이 있습니다.
    Component로는 W5500이 적용된 W5500 Ethernet Shield가 있습니다. 둘다 made in 대한민국!
  • 그럼, 이렇게 TOE가 적용된 Platform과 Component들도 EthernetInterface를 사용하나?
    아니요. TOE가 적용된 Platform과 Component는 WIZnetInterface를 사용해야 합니다.
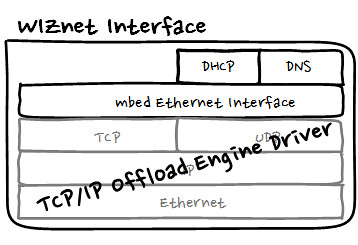
    WIZnetInterface
    WIZnetInterface는 위의 그림처러 TOE Driver를 mbed Ethernet Interface기반으로 포팅하였습니다. 따라서, ARM mbed에서 EthernetInterface를 적용한 program을 WIZnetInterface로 replace하는 것이 가능합니다.

What is new?

  • W7500과 W5500을 어떻게 선택하나
    eth_arch.h을 추가하여 Web-IDE에서 platform을 선택하면 Target Platform에 따라 자동적으로 W7500혹은 W5500을 적용할 수 있다. W5500과 W7500이 통합된 Library이지만 둘 중 하나를 선택하기 위해 여분의 Configuration이 필요없다.
    #if defined(TARGET_WIZwiki_W7500)
    #include "W7500x_toe.h"
    #define __DEF_USED_IC101AG__  //For using IC+101AG@WIZwiki-W7500
    #else
    #include "W5500.h"            // W5500 Ethernet Shield 
    //#define USE_WIZ550IO_MAC    // WIZ550io; using the MAC address
    #endif
    
  • PHY링크를 어떻게 설정하고 확인하나
    Ethernet PHY는 아래의 그림과 같이 RJ45의 Link LED와 Active LED를 이용하여 육안으로 확인이 가능하다. Embedded system에서는 MCU의 GPIO에 Link와 Active Signal을 연결하거나 MDIO Interface를 확인 할 수 있다.
    PHY link
    (http://www.avtech.com/Support/modules/KB/Image/Image/166_RA_LEDs/Ethernet_LEDs_NormalOperation_BothTypes.gif)
    EthernetInterface에서 이러한 기능을 위해 link()와 set_link()를 제공하고 WIZnetInterface에서도 이 API를 제공하고 있다.
    • link()
      PHY링크를 확인할 수 있는 함수 return값이 True이면 Link이고, Fail이면 Link-Fail이다
        * Check if an ethernet link is pressent or not.
        *
        * @returns true if successful
        */
        bool link(int wait_time_ms= 3*1000);
      
    • set_link()
      PHY의 Duplex/SPEED를 설정할 수 있는 함수이다.
       /*
        * Sets the speed and duplex parameters of an ethernet link.
        *
        * @returns true if successful
        */
        void set_link(PHYMode phymode);
      
  • Networking에 필수적으로 필요한 DHCP와 DNS lib를 포함
    dhcpdns

How to import

  • import and update
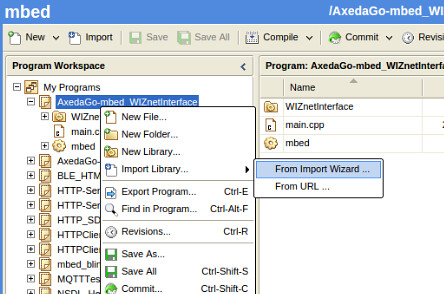
    • WIZnetInterface Library의 import를 위해 import하고자 하는 program에서 오른쪽 클릭 후 ‘From Import Wizard’를 클릭 한다.
      import_WIZnetInterface
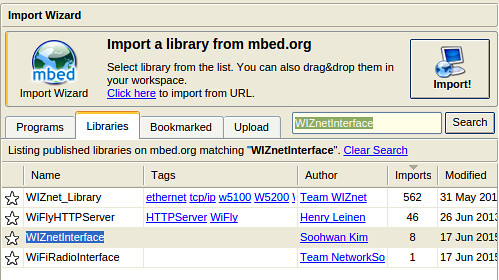
    • import wizard의 검색 창에서 ‘WIZnetInterfae”를 적고 ‘Search’ button을 클릭한다. 검색 결과 창에서 ‘WIZnetInterface’을 선택한 후 거침없이 ‘Import’ button을 클릭!
      search_WIZnetInterface
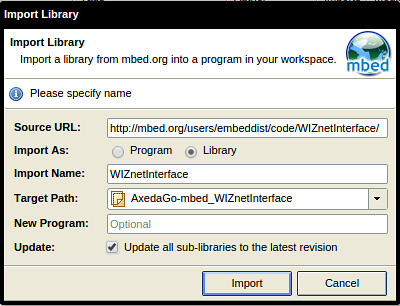
    • Import Library창이 뜨면 당황하지 않고 각항목을 알맞게 ‘Import name’ 과 ‘Target path’설정 한다. 또한 최신의 Library를 import하기 위해 ‘update’ check box를 반드시 체크한다. 그리고 ‘Import’ Button을 클릭하여 WIZnetInteface의 Import를 완료한다.
      importandupdate_WIZnetInteface

Where is Clone repository

파일 버젼관린 시스템 Git과 같은 Mecurial를 ARM mbed에서 적용하고 있다.
아래의 명령어를 이용하여 WIZnetInterface를 Clone할 수 있으며 hg명령어를 이용하여 버젼관리를 할 수 있다.
hg clone https://embeddist@developer.mbed.org/users/embeddist/code/WIZnetInterface/
또한, WIZnetInterface는 ARM mbed의 Team WIZnet에서 관리하고 있으므로 https://developer.mbed.org/teams/WIZnet/를 방문하여 다운 및 다수의 예제를 활용할 수 있다.

How to use

  • make main.cpp
    • WIZwiki_W7500
      #define _DHCP_
      EthernetInterface eth;  /*1. Creat eth object from EthernetInteface class*/
      
      main()
      {
        /*2. MAC address as arr in HEX-Type*/
        uint8_t mac_addr[6] = {0x00, 0x08, 0xDC, 0x01, 0x02, 0x03};  
      
        /*3. Select DHCP or Fixed IP address*/
      #ifdef _DHCP_
        /*3.1 Set  MAC address, Initialize the interface with DHCP*/
        eth.init(mac_addr); 
      #else   
        /*3.2 Set  MAC address and Set MAC, IP, Gatway address and Subnet Mask as String-Type*/
        eth.init(mac_addr, "192.168.77.34", "255.255.255.0", "192.168.77.1"); 
      #endif
      
        /*4. Check Ethernet Link-Done */
        printf("Check Ethernet Link\r\n");
        if(eth.link() == true) { printf("- Ethernet PHY Link-Done \r\n"); }
        else {printf("- Ethernet PHY Link- Fail\r\n");}
      
        /*5. Set IP addresses ,start DHCP if needed  */
        if( eth.connect() == ture )
        {
            printf("Connected, IP: %s\n\r", eth.getIPAddress());
            printf("MASK: %s\n\r", eth.getNetworkMask());
            printf("GW: %s\n\r",eth.getGateway());
        }
        else
        {
            printf("eth.connect fail\n\r");
        }
        ...
      
        /* Your application 
           Visit for examples - https://developer.mbed.org/teams/WIZnet/
        */
      
      }
      
    • W5500 Ethernet Shield
      #define _DHCP_
      /* 0. Set SPI Interface with SPI API*/
      SPI spi(D11, D12, D13);                  // mosi, miso, sclk
      /*1. Creat eth object from EthernetInteface class*/
      EthernetInterface eth(&amp;spi, D10, D9);    // spi, cs, reset
      
      main()
      {
        /*2. MAC address as arr in HEX-Type*/
        uint8_t mac_addr[6] = {0x00, 0x08, 0xDC, 0x01, 0x02, 0x03};  
      
         /*3. Select DHCP or Fixed IP address*/
      #ifdef _DHCP_
        /*3.1 Set  MAC address, Initialize the interface with DHCP*/
        eth.init(mac_addr); 
      #else
        /*3.2 Set  MAC address and Set MAC, IP, Gatway address and Subnet Mask as String-Type */
        eth.init(mac_addr, "192.168.77.34", "255.255.255.0", "192.168.77.1"); 
      #endif
      
        /*3. Check Ethernet Link-Done */
        printf("Check Ethernet Link\r\n");
        if(eth.link() == true) { printf("- Ethernet PHY Link-Done \r\n"); }
        else {printf("- Ethernet PHY Link- Fail\r\n");}
      
        /*4. Set IP addresses ,start DHCP if needed  */
        if( eth.connect() == ture )
        {
            printf("Connected, IP: %s\n\r", eth.getIPAddress());
            printf("MASK: %s\n\r", eth.getNetworkMask());
            printf("GW: %s\n\r",eth.getGateway());
        }
        else
        {
            printf("eth.connect fail\n\r");
        }
        ...
      
        /* Your application 
           Visit for examples - https://developer.mbed.org/teams/WIZnet/
        */
      
      }
      

WIZnetInterface APIs for mbed Ethenret Interface

Ethernet 기반의 Networking을 위해 *Ethenret Interface Library를 ARM mbed에서 제공하고 있으며, 이 Library는 크게 4가지 TCP/IP Protocol layer, Ethernet, EthernetInterface and Socket로 구성되있다.
Internet에 연결하기 위해 EthernetInterface의 각각의 Layer는 APIs들로 구성되어 있다. 각각의 API는 아래의 경로에서 확인할 수 있다.

WIZnetInterface Implementation base on mbed Ethernet Interface

  • EthernetInterface- EthernetInterface Class
    Type Func. Descriptions WIZnetInterface
    static int init () Initialize the interface with DHCP. O
    static int init (const char ip, const char mask, const char *gateway) Initialize the interface with a static IP address. O
    static int connect (unsigned int timeout_ms=15000) Connect Bring the interface up, start DHCP if needed. O
    static int disconnect () Disconnect Bring the interface down. no use
    static char* getMACAddress () Get the MAC address of your Ethernet interface. O
    static char* getIPAddress () Get the IP address of your Ethernet interface. O
    static char* getGateway () Get the Gateway address of your Ethernet interface. O
    static char* getNetworkMask () Get the Network mask of your Ethernet interface. O
    void EthernetInterface (PinName mosi, PinName miso, PinName sclk, PinName cs, PinName reset) Initialize SPI SPI pins to user for SPI interface and Reset pin for W5500 0 (for W5500)
    void EthernetInterface (SPI* spi, PinName cs, PinName reset) Initialize SPI SPI pins to user for SPI interface and Reset pin for W5500 O (for W5500)
  • Socket - TCPSocketServer Class
    Type Func. Descriptions WIZnetInterface
    TCPSocketServer () Instantiate a TCP Server. O
    int bind (int port) Bind a socket to a specific port. O
    int listen (int backlog=1) Start listening for incoming connections. O
    int accept ( TCPSocketConnection &connection) Accept a new connection. O
    void set_blocking (bool blocking, unsigned int timeout=1500) Set blocking or non-blocking mode of the socket and a timeout on blocking socket operations. O
    int set_option (int level, int optname, const void *optval, socklen_t optlen) Set socket options. no use
    int get_option (int level, int optname, void optval, socklen_t optlen) Get socket options. no use
    int close (bool shutdown=true) Get socket options. O
  • Socket - TCPSocketConnection Class
    Type Func. Descriptions WIZnetInterface
    TCPSocketConnection () TCP socket connection. O
    int connect (const char *host, const int port) Connects this TCP socket to the server. O
    bool is_connected (void) Check if the socket is connected. O
    int send (char *data, int length) Send data to the remote host. O
    int send_all (char *data, int length) Send all the data to the remote host. O
    int receive (char *data, int length) Receive data from the remote host. O
    int receive_all (char *data, int length) Receive all the data from the remote host. O
    void set_blocking (bool blocking, unsigned int timeout=1500) Set blocking or non-blocking mode of the socket and a timeout on blocking socket operations. O
    int set_option (int level, int optname, const void *optval, socklen_t optlen) Set socket options. no use
    int get_option (int level, int optname, void optval, socklen_t optlen) Get socket options. no use
    int close (bool shutdown=true) Close the socket. O
    void reset_address (void) Reset the address of this endpoint. O
    int set_address (const char *host, const int port) Set the address of this endpoint. O
    char* get_address (void) Get the IP address of this endpoint. O
    int get_port (void) Get the port of this endpoint. O
  • etnerhet_api - ethernet_api Class
    Type Func. Descriptions WIZnetInterface
    Ethernet () Initialise the ethernet interface. no use
    virtual ~Ethernet () Powers the hardware down. no use
    int write (const char *data, int size) Writes into an outgoing ethernet packet. no use
    int send () Send an outgoing ethernet packet. no use
    int receive () Recevies an arrived ethernet packet. no use
    int read (const char *data, int size) Read from an recevied ethernet packet. no use
    void address (char *mac) Gives the ethernet address of the mbed. no use
    int link() Returns if an ethernet link is pressent or not. O
    void set_link(Mode mode) Sets the speed and duplex parameters of an ethernet link. O