레이블이 W5500 Ethernet Shield인 게시물을 표시합니다. 모든 게시물 표시

2015년 8월 26일 수요일

How to push data to data.sparkfun.com for Internet of Things

How to push data to data.sparkfun.com for Internet of Things

This post shows how to connect Arduino platform to data.sparkfun.com for Internet of Things.

  • Scope of post
    • Internet Connectivity : W5500 Ethernet Shield
    • Cloud Service : data.sparkfun.com
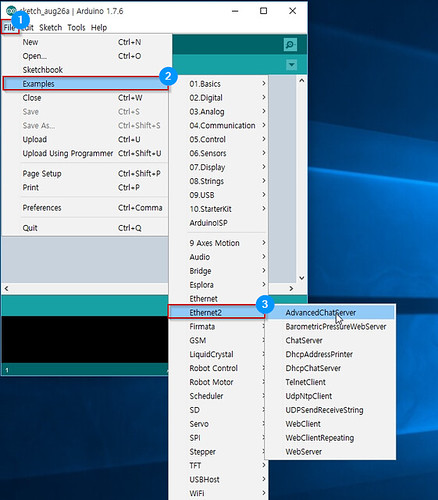
    • Arduino IDE 1.7.6 (arduino.org); surpports Ethernet libraries for W5500
    • HTTP Query

data.sparkfun.com

  • What is Phant?

    • Phant is a open source cloud server platform by powered Sparkfun Electronics.
    • Sparkfun created data.spartfun.com ,which is a free cloud service running phant. -
    • To collect data from your device to cloud service, you just need to register a new stream.
    • After register, you get two keys for accessing the data; one is q private key is required to update that stream, other is a public key grants access to any other stream on the service.
    • All communication with Phant is carried out over HTTP. So, your device should be acted as HTTP Client.
    • http://data.sparkfun.com/input/[publicKey]?private_key=[privateKey]&[field1]=[value]&[field2]=[value]
      
  • Phant : Phant.io

    Phant is a modular node.js based data logging tool for collecting data from the Internet of Things. It is the open source software that powers data.sparkfun.com, and is actively maintained by SparkFun Electronics. Phant is short for elephant. Elephants are known for their remarkable recall ability, so it seemed appropriate to name a data logging project in honor of an animal that never forgets.

Prepare materials

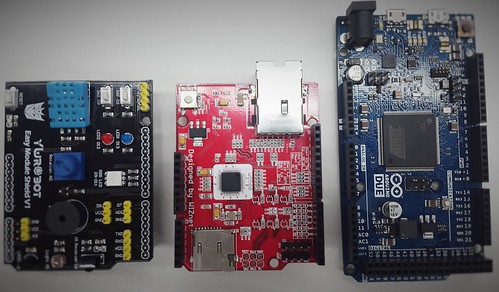
  • Hardware
    hardware
  • Tool : Arduino IDE

  • Registration on data.sparkfun.com
    To create a data stream, head over to data.sparkfun.com, and click “CREATE”.

    • Create a Data Stream

      • New Stream example
        E_New Stream

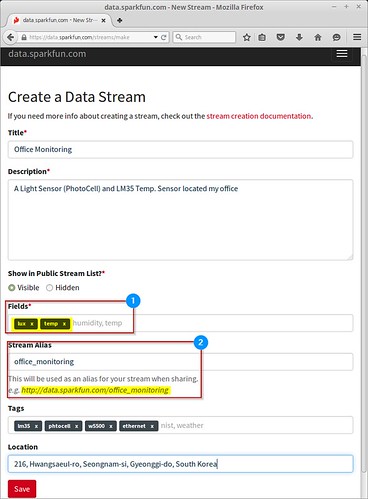
        • Fields - This comma-separated list of words defines data stream to post a list of unique values.
        • Stream Alias - This testbox defines domain name for you Data Stream
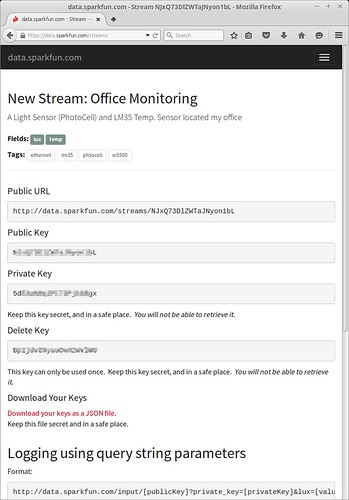
      • Create Data Steam: After creating a data Stream, you will confirm URL, Keys for accessing for your data stream.
        E_New Stream1

Software

Codes flow

  • Configuration Arduino’s I/O pins

    • D3 - Active-low momentary button (pulled high internally)
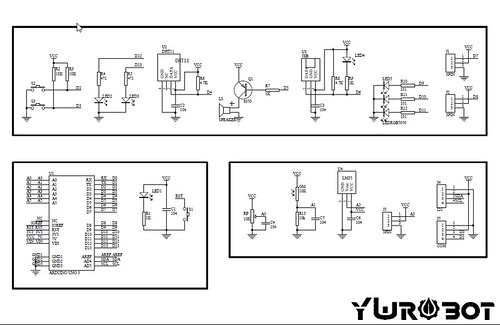
    • A1 - Photoresistor (which is combined with a 10k resistor to form a voltage divider output to the Arduino).
    • A2 - Temporature Sensor (LM35)
  • Configuration Phat Stuff

    • Insert your publicKey
    • Insert your privateKey
    • Generat Fileds; ‘Files name shoud be same “field name” in Create Stream form’
  • setup()

    • Call Serial.begin(115200);
    • Setting Input pins
    • Call setupEthernet(): do DHCP Client and writing MAC Addrerss
  • loop()

    • If the trigger pin (3) goes low, send the data.
      • Get sensing datas by using analogread()
      • Call postData
        • Open socket as TCP Client
        • Try to connet TCP server (data.sparkfun.com); if needs, do DNS clinet for getting IP address of server
        • Make query string based on Phant frame
        • Send query
        • Check for a response from the server, and route it out the serial port.

Arduino’s I/O pins:

const int triggerPin = 3;
const int lightPin = A1;
const int tempPin = A2; 

void setup()
{
...

  // Setup Input Pins:
  pinMode(triggerPin, INPUT_PULLUP);
  pinMode(lightPin, INPUT_PULLUP);
  pinMode(tempPin, INPUT_PULLUP);
...
}

Phant Stuff

const String publicKey = "insert_your_publicKey"; 
const String privateKey = "insert_your_privateKey";

const byte NUM_FIELDS = 2;
const String fieldNames[NUM_FIELDS] = {"lux", "temp"}; // Fileds shoud be same "field names" in Create Stream.
int fieldData[NUM_FIELDS];

Make Query string over HTTP

  • Format
      http://data.sparkfun.com/input/[publicKey]?private_key=[privateKey]&lux=[value]&temp=[value]
    
client.print("GET /input/");
client.print(publicKey);
client.print("?private_key=");
client.print(privateKey);
for (int i=0; i<NUM_FIELDS; i++)
{
  client.print("&");
  client.print(fieldNames[i]);
  client.print("=");
  client.print(fieldData[i]);
}
client.println(" HTTP/1.1");
client.print("Host: ");
client.println(server);
client.println("Connection: close");
client.println();

Phant_Ethernet.ino

/*****************************************************************
Phant_Ethernet.ino
Post data to SparkFun's data stream server system (phant) using
an Arduino and an Ethernet Shield.
Jim Lindblom @ SparkFun Electronics
Original Creation Date: July 3, 2014
Roy Kim(Soohwan Kim) embeddist@gmail.com
Modified DateL August 26, 2015
S

This sketch uses an Arduino Uno to POST sensor readings to 
SparkFun's data logging streams (http://data.sparkfun.com). A post
will be initiated whenever pin 3 is connected to ground.

Before uploading this sketch, there are a number of global vars
that need adjusting:
1. Ethernet Stuff: Fill in your desired MAC and a static IP, even
   if you're planning on having DCHP fill your IP in for you.
   The static IP is only used as a fallback, if DHCP doesn't work.
2. Phant Stuff: Fill in your data stream's public, private, and 
data keys before uploading!

Hardware Hookup:
  * These components are connected to the Arduino's I/O pins:
    <Original>
    * D3 - Active-low momentary button (pulled high internally)
    * A0 - Photoresistor (which is combined with a 10k resistor
           to form a voltage divider output to the Arduino).
    * D5 - SPDT switch to select either 5V or 0V to this pin.
    <Modified>
    * D3 - Active-low momentary button (pulled high internally)
    * A1 - Photoresistor (which is combined with a 10k resistor
           to form a voltage divider output to the Arduino).
    * A2 - Temporature Sensor (LM35)

  * A CC3000 Shield sitting comfortable on top of your Arduino.

Development environment specifics:
    <Original>
    IDE: Arduino 1.0.5 
    Hardware Platform: RedBoard & PoEthernet Shield
    <Modified>
    IDE: Arduino 1.7.6 
    Hardware Platform: Arduino DUE & W5500 Ethernet Shield

This code is beerware; if you see me (or any other SparkFun 
employee) at the local, and you've found our code helpful, please 
buy us a round!

Much of this code is largely based on David Mellis' WebClient
example in the Ethernet library.

Distributed as-is; no warranty is given.
*****************************************************************/
#include <SPI.h> // Required to use Ethernet
//#include <Ethernet.h> // The Ethernet library includes the client for W5100
#include <Ethernet2.h> // The Ethernet library includes the client for W5500
//#include <Progmem.h> // Allows us to sacrifice flash for DRAM //@Modified: Don't use

///////////////////////
// Ethernet Settings //
///////////////////////
// Enter a MAC address for your controller below.
byte mac[] = { 0xDE, 0xAD, 0xBE, 0xEF, 0xFE, 0xED };

// if you don't want to use DNS (and reduce your sketch size)
// use the numeric IP instead of the name for the server:
//IPAddress server(54,86,132,254);  // numeric IP for data.sparkfun.com
char server[] = "data.sparkfun.com";    // name address for data.sparkFun (using DNS)
// Set the static IP address to use if the DHCP fails to assign
IPAddress ip(192,168,0,177);

// Initialize the Ethernet client library
// with the IP address and port of the server 
// that you want to connect to (port 80 is default for HTTP):
EthernetClient client;

/////////////////
// Phant Stuff //
/////////////////
const String publicKey = "6JZbNolApzF4om2l9yYK";
const String privateKey = "Ww0vPW1yrkUNDqWPV9jE";

const byte NUM_FIELDS = 2;
const String fieldNames[NUM_FIELDS] = {"lux", "temp"};
int fieldData[NUM_FIELDS];

//////////////////////
// Input Pins, Misc //
//////////////////////
const int triggerPin = 3;
const int lightPin = A1;
const int tempPin = A2; 

float tempC;
int reading;
//String name = "Ether-anon";
String name = "Roy";
boolean newName = true;

void setup()
{
  Serial.begin(115200);

  // Setup Input Pins:
  pinMode(triggerPin, INPUT_PULLUP);
  pinMode(lightPin, INPUT_PULLUP);
  pinMode(tempPin, INPUT_PULLUP);

  // Set Up Ethernet:
  setupEthernet();

  Serial.println(F("=========== Ready to Stream ==========="));
  Serial.println(F("Press the button (D3) to send an update"));
#if 0 // don't use
  Serial.println(F("Type your name (no spaces!), followed by '!' to update name"));
#endif
}

void loop()
{
  // If the trigger pin (3) goes low, send the data.
  if (!digitalRead(triggerPin))
  {
    // Gather data:
        fieldData[0] = analogRead(lightPin);
        fieldData[1] = analogRead(tempPin);
    //fieldData[2] = name;

    Serial.println("Posting!");
    postData(); // the postData() function does all the work, 
                // check it out below.

    delay(1000);
  }
#if 0 // don't use
  // Check for a new name input:
  if (Serial.available())
  {
    char c = Serial.read();
    if (c == '!')
    {
      newName = true;
      Serial.print("Your name is ");
      Serial.println(name);
    }
    else if (newName)
    {
      newName = false;
      name = "";
      name += c;
    }
    else
    {
      name += c;
    }
  }
#endif
}

void postData()
{
  // Make a TCP connection to remote host
  if (client.connect(server, 80))
  {
    // Post the data! Request should look a little something like:
    // GET /input/publicKey?private_key=privateKey&light=1024&switch=0&name=Jim HTTP/1.1\n
    // Host: data.sparkfun.com\n
    // Connection: close\n
    // \n
    client.print("GET /input/");
    client.print(publicKey);
    client.print("?private_key=");
    client.print(privateKey);
    for (int i=0; i<NUM_FIELDS; i++)
    {
      client.print("&");
      client.print(fieldNames[i]);
      client.print("=");
      client.print(fieldData[i]);
    }
    client.println(" HTTP/1.1");
    client.print("Host: ");
    client.println(server);
    client.println("Connection: close");
    client.println();
  }
  else
  {
    Serial.println(F("Connection failed"));
  } 

  // Check for a response from the server, and route it
  // out the serial port.
  while (client.connected())
  {
    if ( client.available() )
    {
      char c = client.read();
      Serial.print(c);
    }      
  }
  Serial.println();
  client.stop();
}

void setupEthernet()
{
  Serial.println("Setting up Ethernet...");
  // start the Ethernet connection:
  if (Ethernet.begin(mac) == 0) {
    Serial.println(F("Failed to configure Ethernet using DHCP"));
    // no point in carrying on, so do nothing forevermore:
    // try to congifure using IP address instead of DHCP:
    Ethernet.begin(mac, ip);
  }
  Serial.print("My IP address: ");
  Serial.println(Ethernet.localIP());
  // give the Ethernet shield a second to initialize:
  delay(1000);
}

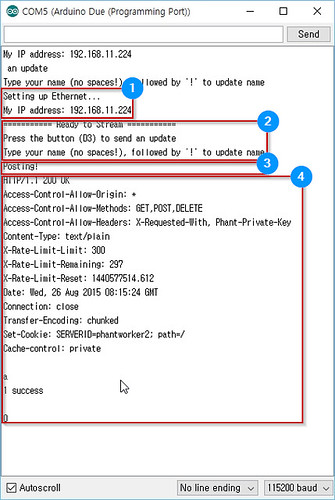
Demo:

Serial Monitor

  1. DHCP Clinet message
  2. Press the button to send query to server, then postData() is called.
  3. Confirm the response message
    E_2015-08-26_17-15-57

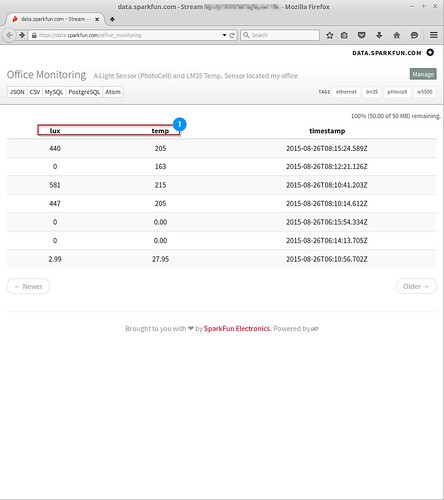
https://data.sparkfun.com/office_monitoring

  • Before sending query
    E_page2

  • After sending query : lux and temp are filed names.
    E_page3

2015년 7월 1일 수요일

ARMmbed WIZnetInterface

WIZnetInterface

WIZnet Ethernet Interface using Hardware TCP/IP chip, W5500 and TCP/IP Offload Engine, W7500.
Users » embeddist » Code » WIZnetInterface

WIZnetInterface ?

  • EthernetInterface in ARM mbed
    mbed.org는 Handbook>>Ethernet에 ARM mbed platform들이 Internet에 Connecting하기 위한 Network Library인 EthernetInterface를 제공하고 있다. EthernetInterface는 TCP/IP Software stack으로 lwIP을 채택하고 있다.
  • WIZnet TCP/IP Offload Engine
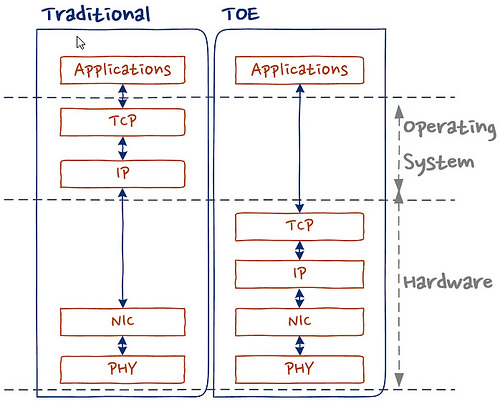
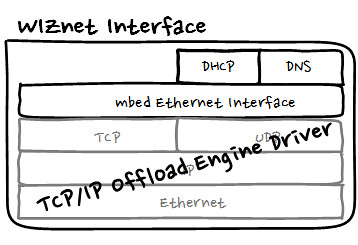
    아래의 그림과 같이 TOE는 TCP이하의 Network Layer가 Hardware적으로 설계되어 있어 Operating System과 Microcontroller의 Networking을 위한 리소스와 메모리를 최소화 해준다. 따라서, 리소스가 제한되는 Low-end IoT Device에서 TOE의 기능이 탑재한 MCU혹은 TOE를 채택한 System은 보다 Networking 이외의 기능들에 최적화 시킬 수 있다.
    TCP/IP Offload Engine
  • 과연, ARM mbed에서 이러한 TOE를 적용한 Platform혹은 Components 있나?
    있습니다. 있고요.
    Platform으로는 W7500이 적용된 WIZwiki_W7500이 있습니다.
    Component로는 W5500이 적용된 W5500 Ethernet Shield가 있습니다. 둘다 made in 대한민국!
  • 그럼, 이렇게 TOE가 적용된 Platform과 Component들도 EthernetInterface를 사용하나?
    아니요. TOE가 적용된 Platform과 Component는 WIZnetInterface를 사용해야 합니다.
    WIZnetInterface
    WIZnetInterface는 위의 그림처러 TOE Driver를 mbed Ethernet Interface기반으로 포팅하였습니다. 따라서, ARM mbed에서 EthernetInterface를 적용한 program을 WIZnetInterface로 replace하는 것이 가능합니다.

What is new?

  • W7500과 W5500을 어떻게 선택하나
    eth_arch.h을 추가하여 Web-IDE에서 platform을 선택하면 Target Platform에 따라 자동적으로 W7500혹은 W5500을 적용할 수 있다. W5500과 W7500이 통합된 Library이지만 둘 중 하나를 선택하기 위해 여분의 Configuration이 필요없다.
    #if defined(TARGET_WIZwiki_W7500)
    #include "W7500x_toe.h"
    #define __DEF_USED_IC101AG__  //For using IC+101AG@WIZwiki-W7500
    #else
    #include "W5500.h"            // W5500 Ethernet Shield 
    //#define USE_WIZ550IO_MAC    // WIZ550io; using the MAC address
    #endif
    
  • PHY링크를 어떻게 설정하고 확인하나
    Ethernet PHY는 아래의 그림과 같이 RJ45의 Link LED와 Active LED를 이용하여 육안으로 확인이 가능하다. Embedded system에서는 MCU의 GPIO에 Link와 Active Signal을 연결하거나 MDIO Interface를 확인 할 수 있다.
    PHY link
    (http://www.avtech.com/Support/modules/KB/Image/Image/166_RA_LEDs/Ethernet_LEDs_NormalOperation_BothTypes.gif)
    EthernetInterface에서 이러한 기능을 위해 link()와 set_link()를 제공하고 WIZnetInterface에서도 이 API를 제공하고 있다.
    • link()
      PHY링크를 확인할 수 있는 함수 return값이 True이면 Link이고, Fail이면 Link-Fail이다
        * Check if an ethernet link is pressent or not.
        *
        * @returns true if successful
        */
        bool link(int wait_time_ms= 3*1000);
      
    • set_link()
      PHY의 Duplex/SPEED를 설정할 수 있는 함수이다.
       /*
        * Sets the speed and duplex parameters of an ethernet link.
        *
        * @returns true if successful
        */
        void set_link(PHYMode phymode);
      
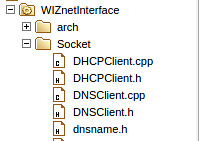
  • Networking에 필수적으로 필요한 DHCP와 DNS lib를 포함
    dhcpdns

How to import

  • import and update
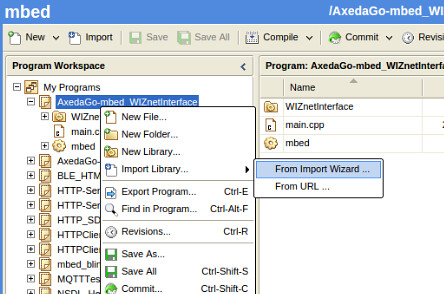
    • WIZnetInterface Library의 import를 위해 import하고자 하는 program에서 오른쪽 클릭 후 ‘From Import Wizard’를 클릭 한다.
      import_WIZnetInterface
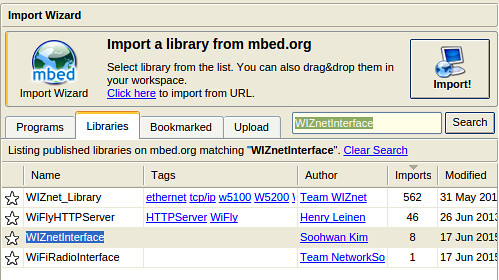
    • import wizard의 검색 창에서 ‘WIZnetInterfae”를 적고 ‘Search’ button을 클릭한다. 검색 결과 창에서 ‘WIZnetInterface’을 선택한 후 거침없이 ‘Import’ button을 클릭!
      search_WIZnetInterface
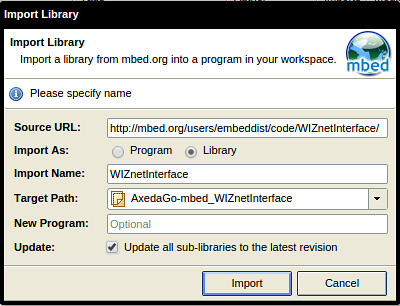
    • Import Library창이 뜨면 당황하지 않고 각항목을 알맞게 ‘Import name’ 과 ‘Target path’설정 한다. 또한 최신의 Library를 import하기 위해 ‘update’ check box를 반드시 체크한다. 그리고 ‘Import’ Button을 클릭하여 WIZnetInteface의 Import를 완료한다.
      importandupdate_WIZnetInteface

Where is Clone repository

파일 버젼관린 시스템 Git과 같은 Mecurial를 ARM mbed에서 적용하고 있다.
아래의 명령어를 이용하여 WIZnetInterface를 Clone할 수 있으며 hg명령어를 이용하여 버젼관리를 할 수 있다.
hg clone https://embeddist@developer.mbed.org/users/embeddist/code/WIZnetInterface/
또한, WIZnetInterface는 ARM mbed의 Team WIZnet에서 관리하고 있으므로 https://developer.mbed.org/teams/WIZnet/를 방문하여 다운 및 다수의 예제를 활용할 수 있다.

How to use

  • make main.cpp
    • WIZwiki_W7500
      #define _DHCP_
      EthernetInterface eth;  /*1. Creat eth object from EthernetInteface class*/
      
      main()
      {
        /*2. MAC address as arr in HEX-Type*/
        uint8_t mac_addr[6] = {0x00, 0x08, 0xDC, 0x01, 0x02, 0x03};  
      
        /*3. Select DHCP or Fixed IP address*/
      #ifdef _DHCP_
        /*3.1 Set  MAC address, Initialize the interface with DHCP*/
        eth.init(mac_addr); 
      #else   
        /*3.2 Set  MAC address and Set MAC, IP, Gatway address and Subnet Mask as String-Type*/
        eth.init(mac_addr, "192.168.77.34", "255.255.255.0", "192.168.77.1"); 
      #endif
      
        /*4. Check Ethernet Link-Done */
        printf("Check Ethernet Link\r\n");
        if(eth.link() == true) { printf("- Ethernet PHY Link-Done \r\n"); }
        else {printf("- Ethernet PHY Link- Fail\r\n");}
      
        /*5. Set IP addresses ,start DHCP if needed  */
        if( eth.connect() == ture )
        {
            printf("Connected, IP: %s\n\r", eth.getIPAddress());
            printf("MASK: %s\n\r", eth.getNetworkMask());
            printf("GW: %s\n\r",eth.getGateway());
        }
        else
        {
            printf("eth.connect fail\n\r");
        }
        ...
      
        /* Your application 
           Visit for examples - https://developer.mbed.org/teams/WIZnet/
        */
      
      }
      
    • W5500 Ethernet Shield
      #define _DHCP_
      /* 0. Set SPI Interface with SPI API*/
      SPI spi(D11, D12, D13);                  // mosi, miso, sclk
      /*1. Creat eth object from EthernetInteface class*/
      EthernetInterface eth(&amp;spi, D10, D9);    // spi, cs, reset
      
      main()
      {
        /*2. MAC address as arr in HEX-Type*/
        uint8_t mac_addr[6] = {0x00, 0x08, 0xDC, 0x01, 0x02, 0x03};  
      
         /*3. Select DHCP or Fixed IP address*/
      #ifdef _DHCP_
        /*3.1 Set  MAC address, Initialize the interface with DHCP*/
        eth.init(mac_addr); 
      #else
        /*3.2 Set  MAC address and Set MAC, IP, Gatway address and Subnet Mask as String-Type */
        eth.init(mac_addr, "192.168.77.34", "255.255.255.0", "192.168.77.1"); 
      #endif
      
        /*3. Check Ethernet Link-Done */
        printf("Check Ethernet Link\r\n");
        if(eth.link() == true) { printf("- Ethernet PHY Link-Done \r\n"); }
        else {printf("- Ethernet PHY Link- Fail\r\n");}
      
        /*4. Set IP addresses ,start DHCP if needed  */
        if( eth.connect() == ture )
        {
            printf("Connected, IP: %s\n\r", eth.getIPAddress());
            printf("MASK: %s\n\r", eth.getNetworkMask());
            printf("GW: %s\n\r",eth.getGateway());
        }
        else
        {
            printf("eth.connect fail\n\r");
        }
        ...
      
        /* Your application 
           Visit for examples - https://developer.mbed.org/teams/WIZnet/
        */
      
      }
      

WIZnetInterface APIs for mbed Ethenret Interface

Ethernet 기반의 Networking을 위해 *Ethenret Interface Library를 ARM mbed에서 제공하고 있으며, 이 Library는 크게 4가지 TCP/IP Protocol layer, Ethernet, EthernetInterface and Socket로 구성되있다.
Internet에 연결하기 위해 EthernetInterface의 각각의 Layer는 APIs들로 구성되어 있다. 각각의 API는 아래의 경로에서 확인할 수 있다.

WIZnetInterface Implementation base on mbed Ethernet Interface

  • EthernetInterface- EthernetInterface Class
    Type Func. Descriptions WIZnetInterface
    static int init () Initialize the interface with DHCP. O
    static int init (const char ip, const char mask, const char *gateway) Initialize the interface with a static IP address. O
    static int connect (unsigned int timeout_ms=15000) Connect Bring the interface up, start DHCP if needed. O
    static int disconnect () Disconnect Bring the interface down. no use
    static char* getMACAddress () Get the MAC address of your Ethernet interface. O
    static char* getIPAddress () Get the IP address of your Ethernet interface. O
    static char* getGateway () Get the Gateway address of your Ethernet interface. O
    static char* getNetworkMask () Get the Network mask of your Ethernet interface. O
    void EthernetInterface (PinName mosi, PinName miso, PinName sclk, PinName cs, PinName reset) Initialize SPI SPI pins to user for SPI interface and Reset pin for W5500 0 (for W5500)
    void EthernetInterface (SPI* spi, PinName cs, PinName reset) Initialize SPI SPI pins to user for SPI interface and Reset pin for W5500 O (for W5500)
  • Socket - TCPSocketServer Class
    Type Func. Descriptions WIZnetInterface
    TCPSocketServer () Instantiate a TCP Server. O
    int bind (int port) Bind a socket to a specific port. O
    int listen (int backlog=1) Start listening for incoming connections. O
    int accept ( TCPSocketConnection &connection) Accept a new connection. O
    void set_blocking (bool blocking, unsigned int timeout=1500) Set blocking or non-blocking mode of the socket and a timeout on blocking socket operations. O
    int set_option (int level, int optname, const void *optval, socklen_t optlen) Set socket options. no use
    int get_option (int level, int optname, void optval, socklen_t optlen) Get socket options. no use
    int close (bool shutdown=true) Get socket options. O
  • Socket - TCPSocketConnection Class
    Type Func. Descriptions WIZnetInterface
    TCPSocketConnection () TCP socket connection. O
    int connect (const char *host, const int port) Connects this TCP socket to the server. O
    bool is_connected (void) Check if the socket is connected. O
    int send (char *data, int length) Send data to the remote host. O
    int send_all (char *data, int length) Send all the data to the remote host. O
    int receive (char *data, int length) Receive data from the remote host. O
    int receive_all (char *data, int length) Receive all the data from the remote host. O
    void set_blocking (bool blocking, unsigned int timeout=1500) Set blocking or non-blocking mode of the socket and a timeout on blocking socket operations. O
    int set_option (int level, int optname, const void *optval, socklen_t optlen) Set socket options. no use
    int get_option (int level, int optname, void optval, socklen_t optlen) Get socket options. no use
    int close (bool shutdown=true) Close the socket. O
    void reset_address (void) Reset the address of this endpoint. O
    int set_address (const char *host, const int port) Set the address of this endpoint. O
    char* get_address (void) Get the IP address of this endpoint. O
    int get_port (void) Get the port of this endpoint. O
  • etnerhet_api - ethernet_api Class
    Type Func. Descriptions WIZnetInterface
    Ethernet () Initialise the ethernet interface. no use
    virtual ~Ethernet () Powers the hardware down. no use
    int write (const char *data, int size) Writes into an outgoing ethernet packet. no use
    int send () Send an outgoing ethernet packet. no use
    int receive () Recevies an arrived ethernet packet. no use
    int read (const char *data, int size) Read from an recevied ethernet packet. no use
    void address (char *mac) Gives the ethernet address of the mbed. no use
    int link() Returns if an ethernet link is pressent or not. O
    void set_link(Mode mode) Sets the speed and duplex parameters of an ethernet link. O