레이블이 W5500인 게시물을 표시합니다. 모든 게시물 표시

2015년 7월 1일 수요일

ARMmbed WIZnetInterface

WIZnetInterface

WIZnet Ethernet Interface using Hardware TCP/IP chip, W5500 and TCP/IP Offload Engine, W7500.
Users » embeddist » Code » WIZnetInterface

WIZnetInterface ?

  • EthernetInterface in ARM mbed
    mbed.org는 Handbook>>Ethernet에 ARM mbed platform들이 Internet에 Connecting하기 위한 Network Library인 EthernetInterface를 제공하고 있다. EthernetInterface는 TCP/IP Software stack으로 lwIP을 채택하고 있다.
  • WIZnet TCP/IP Offload Engine
    아래의 그림과 같이 TOE는 TCP이하의 Network Layer가 Hardware적으로 설계되어 있어 Operating System과 Microcontroller의 Networking을 위한 리소스와 메모리를 최소화 해준다. 따라서, 리소스가 제한되는 Low-end IoT Device에서 TOE의 기능이 탑재한 MCU혹은 TOE를 채택한 System은 보다 Networking 이외의 기능들에 최적화 시킬 수 있다.
    TCP/IP Offload Engine
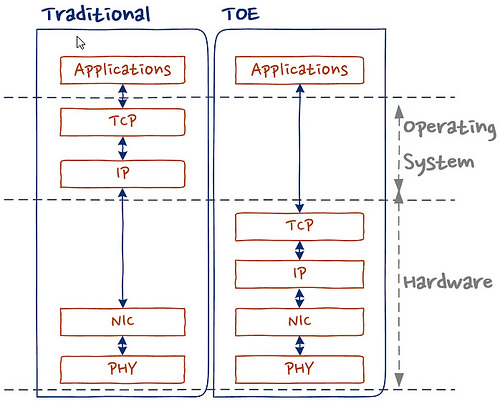
  • 과연, ARM mbed에서 이러한 TOE를 적용한 Platform혹은 Components 있나?
    있습니다. 있고요.
    Platform으로는 W7500이 적용된 WIZwiki_W7500이 있습니다.
    Component로는 W5500이 적용된 W5500 Ethernet Shield가 있습니다. 둘다 made in 대한민국!
  • 그럼, 이렇게 TOE가 적용된 Platform과 Component들도 EthernetInterface를 사용하나?
    아니요. TOE가 적용된 Platform과 Component는 WIZnetInterface를 사용해야 합니다.
    WIZnetInterface
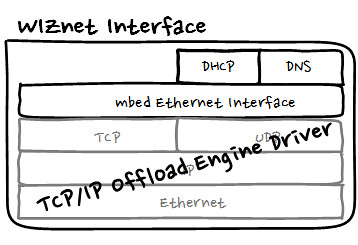
    WIZnetInterface는 위의 그림처러 TOE Driver를 mbed Ethernet Interface기반으로 포팅하였습니다. 따라서, ARM mbed에서 EthernetInterface를 적용한 program을 WIZnetInterface로 replace하는 것이 가능합니다.

What is new?

  • W7500과 W5500을 어떻게 선택하나
    eth_arch.h을 추가하여 Web-IDE에서 platform을 선택하면 Target Platform에 따라 자동적으로 W7500혹은 W5500을 적용할 수 있다. W5500과 W7500이 통합된 Library이지만 둘 중 하나를 선택하기 위해 여분의 Configuration이 필요없다.
    #if defined(TARGET_WIZwiki_W7500)
    #include "W7500x_toe.h"
    #define __DEF_USED_IC101AG__  //For using IC+101AG@WIZwiki-W7500
    #else
    #include "W5500.h"            // W5500 Ethernet Shield 
    //#define USE_WIZ550IO_MAC    // WIZ550io; using the MAC address
    #endif
    
  • PHY링크를 어떻게 설정하고 확인하나
    Ethernet PHY는 아래의 그림과 같이 RJ45의 Link LED와 Active LED를 이용하여 육안으로 확인이 가능하다. Embedded system에서는 MCU의 GPIO에 Link와 Active Signal을 연결하거나 MDIO Interface를 확인 할 수 있다.
    PHY link
    (http://www.avtech.com/Support/modules/KB/Image/Image/166_RA_LEDs/Ethernet_LEDs_NormalOperation_BothTypes.gif)
    EthernetInterface에서 이러한 기능을 위해 link()와 set_link()를 제공하고 WIZnetInterface에서도 이 API를 제공하고 있다.
    • link()
      PHY링크를 확인할 수 있는 함수 return값이 True이면 Link이고, Fail이면 Link-Fail이다
        * Check if an ethernet link is pressent or not.
        *
        * @returns true if successful
        */
        bool link(int wait_time_ms= 3*1000);
      
    • set_link()
      PHY의 Duplex/SPEED를 설정할 수 있는 함수이다.
       /*
        * Sets the speed and duplex parameters of an ethernet link.
        *
        * @returns true if successful
        */
        void set_link(PHYMode phymode);
      
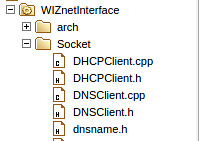
  • Networking에 필수적으로 필요한 DHCP와 DNS lib를 포함
    dhcpdns

How to import

  • import and update
    • WIZnetInterface Library의 import를 위해 import하고자 하는 program에서 오른쪽 클릭 후 ‘From Import Wizard’를 클릭 한다.
      import_WIZnetInterface
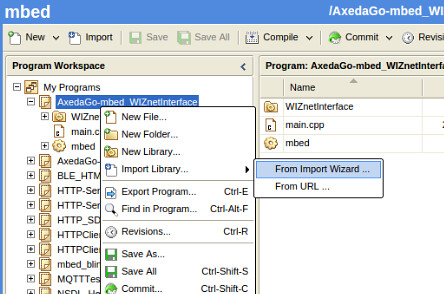
    • import wizard의 검색 창에서 ‘WIZnetInterfae”를 적고 ‘Search’ button을 클릭한다. 검색 결과 창에서 ‘WIZnetInterface’을 선택한 후 거침없이 ‘Import’ button을 클릭!
      search_WIZnetInterface
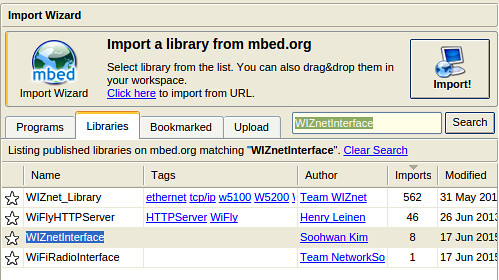
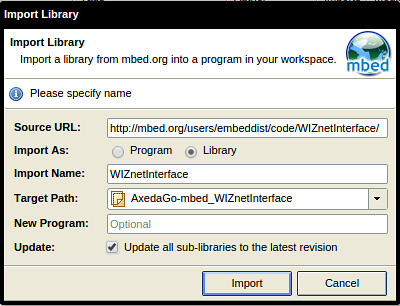
    • Import Library창이 뜨면 당황하지 않고 각항목을 알맞게 ‘Import name’ 과 ‘Target path’설정 한다. 또한 최신의 Library를 import하기 위해 ‘update’ check box를 반드시 체크한다. 그리고 ‘Import’ Button을 클릭하여 WIZnetInteface의 Import를 완료한다.
      importandupdate_WIZnetInteface

Where is Clone repository

파일 버젼관린 시스템 Git과 같은 Mecurial를 ARM mbed에서 적용하고 있다.
아래의 명령어를 이용하여 WIZnetInterface를 Clone할 수 있으며 hg명령어를 이용하여 버젼관리를 할 수 있다.
hg clone https://embeddist@developer.mbed.org/users/embeddist/code/WIZnetInterface/
또한, WIZnetInterface는 ARM mbed의 Team WIZnet에서 관리하고 있으므로 https://developer.mbed.org/teams/WIZnet/를 방문하여 다운 및 다수의 예제를 활용할 수 있다.

How to use

  • make main.cpp
    • WIZwiki_W7500
      #define _DHCP_
      EthernetInterface eth;  /*1. Creat eth object from EthernetInteface class*/
      
      main()
      {
        /*2. MAC address as arr in HEX-Type*/
        uint8_t mac_addr[6] = {0x00, 0x08, 0xDC, 0x01, 0x02, 0x03};  
      
        /*3. Select DHCP or Fixed IP address*/
      #ifdef _DHCP_
        /*3.1 Set  MAC address, Initialize the interface with DHCP*/
        eth.init(mac_addr); 
      #else   
        /*3.2 Set  MAC address and Set MAC, IP, Gatway address and Subnet Mask as String-Type*/
        eth.init(mac_addr, "192.168.77.34", "255.255.255.0", "192.168.77.1"); 
      #endif
      
        /*4. Check Ethernet Link-Done */
        printf("Check Ethernet Link\r\n");
        if(eth.link() == true) { printf("- Ethernet PHY Link-Done \r\n"); }
        else {printf("- Ethernet PHY Link- Fail\r\n");}
      
        /*5. Set IP addresses ,start DHCP if needed  */
        if( eth.connect() == ture )
        {
            printf("Connected, IP: %s\n\r", eth.getIPAddress());
            printf("MASK: %s\n\r", eth.getNetworkMask());
            printf("GW: %s\n\r",eth.getGateway());
        }
        else
        {
            printf("eth.connect fail\n\r");
        }
        ...
      
        /* Your application 
           Visit for examples - https://developer.mbed.org/teams/WIZnet/
        */
      
      }
      
    • W5500 Ethernet Shield
      #define _DHCP_
      /* 0. Set SPI Interface with SPI API*/
      SPI spi(D11, D12, D13);                  // mosi, miso, sclk
      /*1. Creat eth object from EthernetInteface class*/
      EthernetInterface eth(&spi, D10, D9);    // spi, cs, reset
      
      main()
      {
        /*2. MAC address as arr in HEX-Type*/
        uint8_t mac_addr[6] = {0x00, 0x08, 0xDC, 0x01, 0x02, 0x03};  
      
         /*3. Select DHCP or Fixed IP address*/
      #ifdef _DHCP_
        /*3.1 Set  MAC address, Initialize the interface with DHCP*/
        eth.init(mac_addr); 
      #else
        /*3.2 Set  MAC address and Set MAC, IP, Gatway address and Subnet Mask as String-Type */
        eth.init(mac_addr, "192.168.77.34", "255.255.255.0", "192.168.77.1"); 
      #endif
      
        /*3. Check Ethernet Link-Done */
        printf("Check Ethernet Link\r\n");
        if(eth.link() == true) { printf("- Ethernet PHY Link-Done \r\n"); }
        else {printf("- Ethernet PHY Link- Fail\r\n");}
      
        /*4. Set IP addresses ,start DHCP if needed  */
        if( eth.connect() == ture )
        {
            printf("Connected, IP: %s\n\r", eth.getIPAddress());
            printf("MASK: %s\n\r", eth.getNetworkMask());
            printf("GW: %s\n\r",eth.getGateway());
        }
        else
        {
            printf("eth.connect fail\n\r");
        }
        ...
      
        /* Your application 
           Visit for examples - https://developer.mbed.org/teams/WIZnet/
        */
      
      }
      

WIZnetInterface APIs for mbed Ethenret Interface

Ethernet 기반의 Networking을 위해 *Ethenret Interface Library를 ARM mbed에서 제공하고 있으며, 이 Library는 크게 4가지 TCP/IP Protocol layer, Ethernet, EthernetInterface and Socket로 구성되있다.
Internet에 연결하기 위해 EthernetInterface의 각각의 Layer는 APIs들로 구성되어 있다. 각각의 API는 아래의 경로에서 확인할 수 있다.

WIZnetInterface Implementation base on mbed Ethernet Interface

  • EthernetInterface- EthernetInterface Class
    Type Func. Descriptions WIZnetInterface
    static int init () Initialize the interface with DHCP. O
    static int init (const char ip, const char mask, const char *gateway) Initialize the interface with a static IP address. O
    static int connect (unsigned int timeout_ms=15000) Connect Bring the interface up, start DHCP if needed. O
    static int disconnect () Disconnect Bring the interface down. no use
    static char* getMACAddress () Get the MAC address of your Ethernet interface. O
    static char* getIPAddress () Get the IP address of your Ethernet interface. O
    static char* getGateway () Get the Gateway address of your Ethernet interface. O
    static char* getNetworkMask () Get the Network mask of your Ethernet interface. O
    void EthernetInterface (PinName mosi, PinName miso, PinName sclk, PinName cs, PinName reset) Initialize SPI SPI pins to user for SPI interface and Reset pin for W5500 0 (for W5500)
    void EthernetInterface (SPI* spi, PinName cs, PinName reset) Initialize SPI SPI pins to user for SPI interface and Reset pin for W5500 O (for W5500)
  • Socket - TCPSocketServer Class
    Type Func. Descriptions WIZnetInterface
    TCPSocketServer () Instantiate a TCP Server. O
    int bind (int port) Bind a socket to a specific port. O
    int listen (int backlog=1) Start listening for incoming connections. O
    int accept ( TCPSocketConnection &connection) Accept a new connection. O
    void set_blocking (bool blocking, unsigned int timeout=1500) Set blocking or non-blocking mode of the socket and a timeout on blocking socket operations. O
    int set_option (int level, int optname, const void *optval, socklen_t optlen) Set socket options. no use
    int get_option (int level, int optname, void optval, socklen_t optlen) Get socket options. no use
    int close (bool shutdown=true) Get socket options. O
  • Socket - TCPSocketConnection Class
    Type Func. Descriptions WIZnetInterface
    TCPSocketConnection () TCP socket connection. O
    int connect (const char *host, const int port) Connects this TCP socket to the server. O
    bool is_connected (void) Check if the socket is connected. O
    int send (char *data, int length) Send data to the remote host. O
    int send_all (char *data, int length) Send all the data to the remote host. O
    int receive (char *data, int length) Receive data from the remote host. O
    int receive_all (char *data, int length) Receive all the data from the remote host. O
    void set_blocking (bool blocking, unsigned int timeout=1500) Set blocking or non-blocking mode of the socket and a timeout on blocking socket operations. O
    int set_option (int level, int optname, const void *optval, socklen_t optlen) Set socket options. no use
    int get_option (int level, int optname, void optval, socklen_t optlen) Get socket options. no use
    int close (bool shutdown=true) Close the socket. O
    void reset_address (void) Reset the address of this endpoint. O
    int set_address (const char *host, const int port) Set the address of this endpoint. O
    char* get_address (void) Get the IP address of this endpoint. O
    int get_port (void) Get the port of this endpoint. O
  • etnerhet_api - ethernet_api Class
    Type Func. Descriptions WIZnetInterface
    Ethernet () Initialise the ethernet interface. no use
    virtual ~Ethernet () Powers the hardware down. no use
    int write (const char *data, int size) Writes into an outgoing ethernet packet. no use
    int send () Send an outgoing ethernet packet. no use
    int receive () Recevies an arrived ethernet packet. no use
    int read (const char *data, int size) Read from an recevied ethernet packet. no use
    void address (char *mac) Gives the ethernet address of the mbed. no use
    int link() Returns if an ethernet link is pressent or not. O
    void set_link(Mode mode) Sets the speed and duplex parameters of an ethernet link. O

2014년 11월 18일 화요일

Note6 - WebServer

ArduinoNote List-page
PREVIOUS: Note5 - isShield-A

Hand-on #3: WebServer


-Ethernet Shield를 이용한 Remote monitoring을 해보자

Web-Server?


Web-Server는 Web-site를 hosting하고 있는 서버로 간단하게 아래의 그림과 같이 Web brower와 같은 Client가 Web-server에 저장되어 있는 Web-page에 대한 Request 요청했을 경우 해당 Wep-page를 Client에세 Reponse하는 Server는 말한다. 이때 Web-server와 Client는 Hypertext Transfer Protocol (HTTP)통해서 hypertext를 Trasfer/Exchange한다.

Network Configuration

Get Request:index.htm

Install Ethenret Library


Network Configuration on PC side


Network Configuration

위와 같이 "Internet Protocol Properies"에서 Network구성을 Test를 위해 아래와 같이 설정해보자

    IP address : 192.168.1.2
Subnet mask : 255.255.255.0
Default gateway : 192.168.1.1


Web Server Sketch


  • Fixed IP address


[code lang=cpp]
IPAddress ip(192, 168, 1, 20);
IPAddress gateway(192, 168, 1, 1);
IPAddress subnet(255, 255, 255, 0);
// fill in your Domain Name Server address here:
IPAddress myDns(8, 8, 8, 8); // google puble dns
void setup() {
...
#if defined(WIZ550io_WITH_MACADDRESS) // Use assigned MAC address of WIZ550io
Ethernet.begin(ip, myDns, gateway, subnet);
#else
Ethernet.begin(mac, ip, myDns, gateway, subnet);
#endif
...
}
[/code]


  • Port Setting


[code lang=cpp]
// Initialize the Ethernet server library
// with the IP address and port you want to use
// (port 80 is default for HTTP):
EthernetServer server(80);
[/code]


  • setup()


[code lang=cpp]
void setup()
{
// Open serial communications and wait for port to open:
Serial.begin(9600);
while (!Serial)
{
; // wait for serial port to connect. Needed for Leonardo only
}

// start the Ethernet connection and the server:
#if defined(WIZ550io_WITH_MACADDRESS) // Use assigned MAC address of WIZ550io
Ethernet.begin(ip, myDns, gateway, subnet);
#else
Ethernet.begin(mac, ip, myDns, gateway, subnet);
#endif
server.begin();
Serial.print("server is at ");
Serial.println(Ethernet.localIP());
}

[/code]


  • loop()


[code lang=cpp]
void loop() {
// listen for incoming clients
EthernetClient client = server.available();
if (client) {
Serial.println("new client");
// an http request ends with a blank line
boolean currentLineIsBlank = true;
while (client.connected()) {
if (client.available()) {
char c = client.read();
Serial.write(c);
// if you've gotten to the end of the line (received a newline
// character) and the line is blank, the http request has ended,
// so you can send a reply
if (c == 'n' && currentLineIsBlank) {
// send a standard http response header
client.println("HTTP/1.1 200 OK");
client.println("Content-Type: text/html");
client.println("Connection: close"); // the connection will be closed after completion of the response
client.println("Refresh: 5"); // refresh the page automatically every 5 sec
client.println();
client.println("<!DOCTYPE HTML>");
client.println("<html>");
// output the value of each analog input pin
for (int analogChannel = 0; analogChannel < 6; analogChannel++) {
int sensorReading = analogRead(analogChannel);
client.print("analog input ");
client.print(analogChannel);
client.print(" is ");
client.print(sensorReading);
client.println("<br />");
}
client.println("</html>");
break;
}
if (c == 'n') {
// you're starting a new line
currentLineIsBlank = true;
}
else if (c != 'r') {
// you've gotten a character on the current line
currentLineIsBlank = false;
}
}
}
// give the web browser time to receive the data
delay(1);
// close the connection:
client.stop();
Serial.println("client disconnected");
}

[/code]

Compile


  • IDE 메뉴의 스케치>확인/컴파일
    Verify


Program


  • IDE 메뉴의 파일>프로그램어를통해업로드
    Upload


Web-Client (Web-browser)를 이용하여 Web-server (Arduino Board)에 접속


  • web-browser을 실행하고 주소창에 아래와 같이 입력한다.

    http://"Arduino board IP address":"port number
    http://192.168.1.20:80

  • Web-browser실행 화면
    실제로 port에서 입력된 값을 Web-page를 통해 보여줌으로써 Remote Monitoring이 가능함을 보여준다. 5개의 값들은 ADC입력 값을 출력한다. 현재 ADC에 입력이 없기 때문에 Dummy값이 출력되는 것을 볼수 있다.
    Web-browser
    Serial Monitor를 통해 Log값을 볼수 있다. Welcome message와 Web-Client로 부터 수신한 내용을 확인 할 수 있다.
    Serial Monitor


NEXT : Note7 - WebServer controlled LED

Note5 - ioShield-A

ArduinoNote List-page
PREVIOUS: Note4 - Ethernet shield

ioShield-A


ioSheild-A

ioShield-A는 Arduino Platform을 Internet에 연결하게 해주는 Ethernet Shield의 하나이다. Ethernet Shield는 TCP/IPCore Chip으로 W5100의 기반으로 하였으나, ioShield는 W5500을 적용하였다. W5500은 동시에 W5100보다 많은 소켓 수(8Socket)지원 할 수 있으며, Fast SPI (upto 80MHz)를 지원한다. 특별히, 이 Ethenret Shield는 WIZ550io와 Installing Board로 구성되어 있으며, WIZ550io에서 embedded된 MAC Address를 지원하기 때문에 별도의 MAC Address구매없이 Real MAC Address를 사용할 수 있다.

ioShield-A
* WIZ550io: wizwiki
* Schematic: ioshield-a_v1.1_sch.pdf
* Ethernet Library: WIZ_Ethernet_Library
* SPI port: ICSP Header사용
* Github: frizing project for WIZ550io

WIZ Ethernet Library Install


  • Download Library: WIZ_Ethernet_Library-master.zip


  • 압축해제 한뒤 Ethernet폴더를 Copy한다.
    Ethernet폴더


  • 기존의 Sketch IDE를 설치하고 생긴 C:/Program Files/Arduino/Ethernet폴더와 Replace한다.
    Ethernet폴더 replace


  • Ethernet Library에 /Arduino/Ethernet/examples 아래와 같이 다양한 example들이 포함되어 있다.
    Ethernet Library


NEXT : Note6 - WebServer

2014년 10월 14일 화요일

ARDUINO with TEMBOO


-www.temboo.com


템부(Temboo)는 기업들은 API 관리 전문업체 중 하나이다. 보안 API 접속 서비스는 물론이고 일부는 API 호환 서비스를, 또 일부는 클라우드 기반의 API 접근경로를 제공한다.


-Program hardware for the Internet of Things


위의 그림처럼 IoT의 hardware 들을 위한 API (Agent+SDK), Cloud service까지 그 영역을 넓혀가는 중이며 Open Hardware의 선두주가 Arduino와 LaunchPad를 중심으로한 Texas Instruments사의 Platform을 현재 지원중이다.


글보단 한편의 동영상으로 Temboo를 이해해 보자


[vimeo http://vimeo.com/70791007]


IoT Hardware을 위한 API를 살펴보면서 그 막강한 기능을 체험해보자.


Yahoo Weather를 Temboo와 Arduino를 이용한다.


*Preparation materials


-Arduino board : Arduino Due
-Ethernet Shield : WIZ550io (W5500 with MAC address)
-IDE : IDE 1.5.7
-Lib. : Ethernet Lib. and Temboo Lib


1. 먼저 Temboo에 로그인 한뒤 아래의 페이지에서 “Arudino” 클릭 


-Select Arduino on Program hardware for the Internet of Things


2. ARDUINO+TEMBOO에서 자신이 사용하려는 Hardware선택 


- Select Device: Arduino Yun or Other Arduino Boards + Internet Shield


3. 이제 Temboo Arduino Library의 설치를 위해 아래의 그림에서 우측상단의 “Download”클릭 


- ARDUINO+TEMBOO


4. Installing에 관한 대용은 아래의 사이트를 참고하며 간단하게 download된 Temboo Arduino Library를 “C:\Program Files\Arduino\libraries” 에 압축을 푼다. IDE1.5.7기준! 


- Installing the Temboo Arduino Library


5. 이제 예제를 선택한다 여기서는 GetWeatherByAddress! 


- Select GetWeatherByAddress with Temboo Arduino Library


6. 이제 몇가지 설정으로 GetWeatherByAddress.ino를 생성 시키자
-우측상단의 “IoT Mode”를 “ON”으로 활성화
-GetWeatherByAddress란에서 “The address to be searched”밑의 박스에 “Seoul”를 입력 뒤 코드의 생성을 위해 Run을 클릭
-CODE란에 생성된 코드 확인 및 복사 


- Configuration and Generation of CODE


7. IDE에서 Compile 및 다운로드
-“C:\Program Files\Arduino\libraries\Temboo\”폴더 밑에 아래와 같이 examples\YahooWeather폴더를 생성한다.
-“C:\Program Files\Arduino\libraries\Temboo\examples\YahooWeather”에 복사한 코드를 폴더명과 같은 이름으로 복사한다.
- 컴파일 후 다운로드


8. Demo: Serial Monitoring
아래와 같이 Seoul의 날씨를 HTTP Get을 통해 해당 웹페이지를 다운받아 Serial로 출력시키는 것을 볼 수 있다.


-Get Seoul Weather http message on Serial Monitoring


2014년 7월 15일 화요일

WIZ Ethernet Library for Arduino IDE 1.5.7

WIZ_Ethernet_Lib_IDE1.5.7.git


The Ethernet library lets you connect to the Internet or a local network.

Supported devices


  • ioShield, WIZ550io (used in W5500)

  • W5200 Ethernet Shield, WIZ820io (used in W5200)

  • Ethernet Shield (used in W5100)


Hardware


Software


Install WIZ Ethernet library


Download all files and overwrite onto the"Arduino\libraries\Ethernet" folder in your project in sketch.
- Ethernet folder has two folers, examples and src folers.

Select device(shield)


Uncomment device(shiel) you want to use.

[code lang=cpp]
//ArduinolibrariesEthernetutilityw5100.h
#ifndef W5100_H_INCLUDED
#define W5100_H_INCLUDED

#include <avr/pgmspace.h>
#include

typedef uint8_t SOCKET;
//#define W5100_ETHERNET_SHIELD
//#define W5200_ETHERNET_SHIELD
#define W5500_ETHERNET_SHIELD
[/code]

Using the WIZ Ethernet library and evaluate existing Ethernet example.


All other steps are the same as the steps from the Arduino Ethernet Shield.
You can use examples in ./Ethernet/examples folder for the Arduino IDE 1.5.7, go to Files->Examples->Ethernet, open any example, then copy it to your sketch file and change configuration values properly.
After that, you can check if it is work well. For example, if you choose 'WebServer', you should change IP Address first and compile and download it. Then you can access web server page through your web browser of your PC or something.

Revision History


Initial Release : 15 Jul. 2014

2013년 11월 28일 목요일

2013년 8월 26일 월요일

WebLED for GR-KURUMI


WebLED for GR-KURUMI


  • Web Server & LED Blink


A simple web server that shows and control the value of the LED Digital…


View Post

WebLED for GR-KURUMI


  • Web Server & LED Blink


A simple web server that shows and control the value of the LED Digital using an Arduino Wiznet Ethernet shield. This sketch for GR-KURUMI is merged Web-server and LED Blink. You can do controlling and monitoring the RGB LED on GR KURUMI Board via Internet or Local Network.
After opening a web-browser and navigating to the Ethernet shield’s IP address, the GR-KURUMI will respond with just enough HTML for a browser to display the data. A RGB LED on GR-KURUMI is also controlled by the request of web-browser.


  • Circuit


  • Ethernet shield attached to pins 10, 11, 12, 13

  • Pin 22,23,24 has an LED connected on most Arduino boards.

  • Pin22: LED_RED

  • Pin23: LED_GREEN

  • Pin24: LED_BULE


  • SW


  • Code


  • Configuration of IP address

    IPAddress ip(192,168,1,177);


  • Initalize the Port (port80 is default for HTTP)

    EthernetServer server(80);


  • Parsing of HTTP GET Message


When web-page address is http://192.168.1.177/G0 to on the Green LEN,
the received HTTP GET Message is as below,

GET /G0 HTTP/1.1
Accept: text/html, application/xhtml+xml,....


So, 5th~7th data are parsed to control RGB LEDs.

//5th~7th data of HTTP GET Message is parsed as parse_arr
parse_arr[0] = '/'
parse_arr[1] = 'G'
parse_arr[2] = '0'


  • Contorl RGB LEDs as data pased from HTTP GET Message

    if(parse_arr[0] == '/'){
    switch(parse_arr[1]){
    case('R') :
    // http://192.168.1.177:R0 => Red LED OFF
    if(parse_arr[2] == '0'){
    digitalWrite(led_red, HIGH);
    // http://192.168.1.177:R1 => Red LED ON
    }else if(parse_arr[2] == '1'){
    digitalWrite(led_red, LOW);
    }
    break;
    ...


  • Send a standard http response
    Check current LED status as digitalRead() and Send http respoonse inclued the LED status.

    int sensorReading = digitalRead(led_red);
    client.print("digitalRead(LED_RED)");//client.print(led_red);
    client.print(" is ");
    client.print(sensorReading);
    client.println("
    ");
    ...


  • Address Lists
    http://192.168.1.177/G0 => Green OFF
    http://192.168.1.177/G1 => Green ON
    http://192.168.1.177/R0 => RED OFF
    http://192.168.1.177/R1 => RED ON
    http://192.168.1.177/B0 => BLUE OFF
    http://192.168.1.177/B1 => BLUE ON
    http://192.168.1.177/B3 => BLINK START
    http://192.168.1.177/B3 => BLINK STOP


GR-KURUMI + Ethernet


GR-KURUMI (RL78/G13) + WIZ550io(W5500)