How to push data to data.sparkfun.com for Internet of Things
This post shows how to connect Arduino platform to data.sparkfun.com for Internet of Things.
- Scope of post
- Internet Connectivity : W5500 Ethernet Shield
- Cloud Service : data.sparkfun.com
- Arduino IDE 1.7.6 (arduino.org); surpports Ethernet libraries for W5500
- HTTP Query
data.sparkfun.com
-
- Phant is a open source cloud server platform by powered Sparkfun Electronics.
- Sparkfun created data.spartfun.com ,which is a free cloud service running phant. -
- To collect data from your device to cloud service, you just need to register a new stream.
- After register, you get two keys for accessing the data; one is q private key is required to update that stream, other is a public key grants access to any other stream on the service.
- All communication with Phant is carried out over HTTP. So, your device should be acted as HTTP Client.
http://data.sparkfun.com/input/[publicKey]?private_key=[privateKey]&[field1]=[value]&[field2]=[value]
- Phant : Phant.io
Phant is a modular node.js based data logging tool for collecting data from the Internet of Things. It is the open source software that powers data.sparkfun.com, and is actively maintained by SparkFun Electronics. Phant is short for elephant. Elephants are known for their remarkable recall ability, so it seemed appropriate to name a data logging project in honor of an animal that never forgets.
Prepare materials
- Hardware
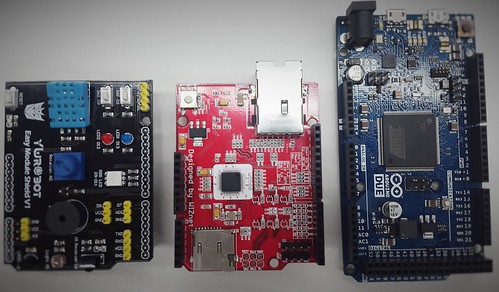
- Arudino Board : Arduino due ,[SCH]
- Ethernet Shield : W5500 Ethernet Shield,[SCH]
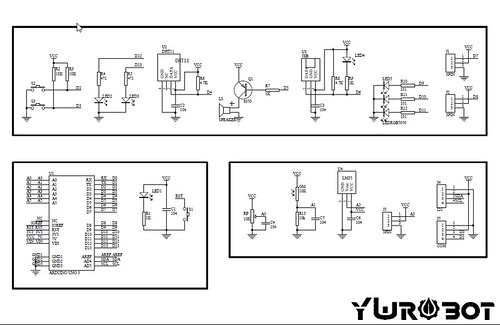
- Sensors (ywrobot easy module shield v1): LM35(Temp.), PhotoCell(light)
Tool : Arduino IDE
- Arduino IDE@arduion.org
Arduino 1.7.6 (http://www.arduino.org/downloads) of arduino.org supports Ethernet2 libraries for Ethernet shield based on W5500, while Ethernet libraries supports Ethernet shield based on W5100.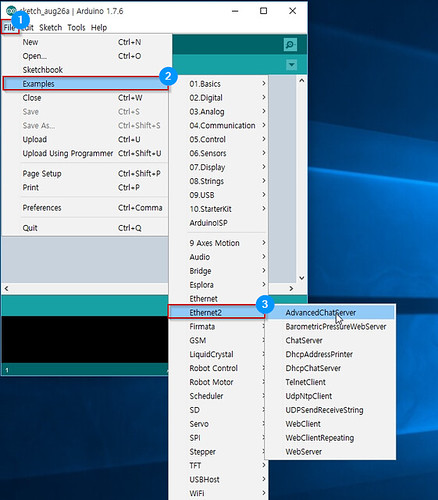
- Arduino IDE@arduion.cc
To use W5500 Ethernet Shield on Arduion IDE of Arduino.cc, you should be install the WIZnet Ethernet Library.
- Arduino IDE@arduion.org
Registration on data.sparkfun.com
To create a data stream, head over to data.sparkfun.com, and click “CREATE”.Create a Data Stream
New Stream example
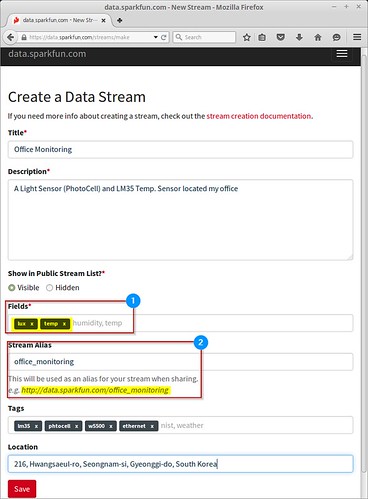
- Fields - This comma-separated list of words defines data stream to post a list of unique values.
- Stream Alias - This testbox defines domain name for you Data Stream
Create Data Steam: After creating a data Stream, you will confirm URL, Keys for accessing for your data stream.
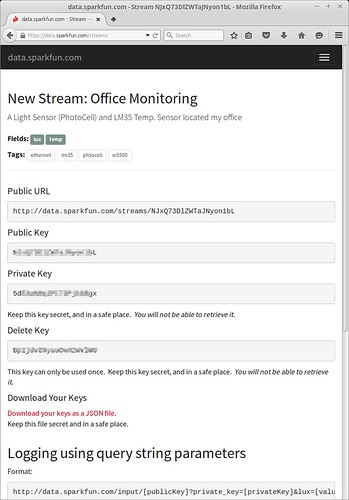
Software
Codes flow
Configuration Arduino’s I/O pins
- D3 - Active-low momentary button (pulled high internally)
- A1 - Photoresistor (which is combined with a 10k resistor to form a voltage divider output to the Arduino).
- A2 - Temporature Sensor (LM35)
Configuration Phat Stuff
- Insert your publicKey
- Insert your privateKey
- Generat Fileds; ‘Files name shoud be same “field name” in Create Stream form’
setup()
- Call Serial.begin(115200);
- Setting Input pins
- Call setupEthernet(): do DHCP Client and writing MAC Addrerss
loop()
- If the trigger pin (3) goes low, send the data.
- Get sensing datas by using analogread()
- Call postData
- Open socket as TCP Client
- Try to connet TCP server (data.sparkfun.com); if needs, do DNS clinet for getting IP address of server
- Make query string based on Phant frame
- Send query
- Check for a response from the server, and route it out the serial port.
- If the trigger pin (3) goes low, send the data.
Arduino’s I/O pins:
const int triggerPin = 3;
const int lightPin = A1;
const int tempPin = A2;

void setup()
{
...

  // Setup Input Pins:
  pinMode(triggerPin, INPUT_PULLUP);
  pinMode(lightPin, INPUT_PULLUP);
  pinMode(tempPin, INPUT_PULLUP);
...
}
Phant Stuff
const String publicKey = "insert_your_publicKey";
const String privateKey = "insert_your_privateKey";

const byte NUM_FIELDS = 2;
const String fieldNames[NUM_FIELDS] = {"lux", "temp"}; // Fileds shoud be same "field names" in Create Stream.
int fieldData[NUM_FIELDS];
Make Query string over HTTP
- Format
http://data.sparkfun.com/input/[publicKey]?private_key=[privateKey]&lux=[value]&temp=[value]
client.print("GET /input/");
client.print(publicKey);
client.print("?private_key=");
client.print(privateKey);
for (int i=0; i<NUM_FIELDS; i++)
{
  client.print("&");
  client.print(fieldNames[i]);
  client.print("=");
  client.print(fieldData[i]);
}
client.println(" HTTP/1.1");
client.print("Host: ");
client.println(server);
client.println("Connection: close");
client.println();
Phant_Ethernet.ino
/*****************************************************************
Phant_Ethernet.ino
Post data to SparkFun's data stream server system (phant) using
an Arduino and an Ethernet Shield.
Jim Lindblom @ SparkFun Electronics
Original Creation Date: July 3, 2014
Roy Kim(Soohwan Kim) embeddist@gmail.com
Modified DateL August 26, 2015
S

This sketch uses an Arduino Uno to POST sensor readings to
SparkFun's data logging streams (http://data.sparkfun.com). A post
will be initiated whenever pin 3 is connected to ground.

Before uploading this sketch, there are a number of global vars
that need adjusting:
1. Ethernet Stuff: Fill in your desired MAC and a static IP, even
   if you're planning on having DCHP fill your IP in for you.
   The static IP is only used as a fallback, if DHCP doesn't work.
2. Phant Stuff: Fill in your data stream's public, private, and
data keys before uploading!

Hardware Hookup:
  * These components are connected to the Arduino's I/O pins:
    <Original>
    * D3 - Active-low momentary button (pulled high internally)
    * A0 - Photoresistor (which is combined with a 10k resistor
           to form a voltage divider output to the Arduino).
    * D5 - SPDT switch to select either 5V or 0V to this pin.
    <Modified>
    * D3 - Active-low momentary button (pulled high internally)
    * A1 - Photoresistor (which is combined with a 10k resistor
           to form a voltage divider output to the Arduino).
    * A2 - Temporature Sensor (LM35)

  * A CC3000 Shield sitting comfortable on top of your Arduino.

Development environment specifics:
    <Original>
    IDE: Arduino 1.0.5
    Hardware Platform: RedBoard & PoEthernet Shield
    <Modified>
    IDE: Arduino 1.7.6
    Hardware Platform: Arduino DUE & W5500 Ethernet Shield

This code is beerware; if you see me (or any other SparkFun
employee) at the local, and you've found our code helpful, please
buy us a round!

Much of this code is largely based on David Mellis' WebClient
example in the Ethernet library.

Distributed as-is; no warranty is given.
*****************************************************************/
#include <SPI.h> // Required to use Ethernet
//#include <Ethernet.h> // The Ethernet library includes the client for W5100
#include <Ethernet2.h> // The Ethernet library includes the client for W5500
//#include <Progmem.h> // Allows us to sacrifice flash for DRAM //@Modified: Don't use

///////////////////////
// Ethernet Settings //
///////////////////////
// Enter a MAC address for your controller below.
byte mac[] = { 0xDE, 0xAD, 0xBE, 0xEF, 0xFE, 0xED };

// if you don't want to use DNS (and reduce your sketch size)
// use the numeric IP instead of the name for the server:
//IPAddress server(54,86,132,254);  // numeric IP for data.sparkfun.com
char server[] = "data.sparkfun.com";    // name address for data.sparkFun (using DNS)
// Set the static IP address to use if the DHCP fails to assign
IPAddress ip(192,168,0,177);

// Initialize the Ethernet client library
// with the IP address and port of the server
// that you want to connect to (port 80 is default for HTTP):
EthernetClient client;

/////////////////
// Phant Stuff //
/////////////////
const String publicKey = "6JZbNolApzF4om2l9yYK";
const String privateKey = "Ww0vPW1yrkUNDqWPV9jE";

const byte NUM_FIELDS = 2;
const String fieldNames[NUM_FIELDS] = {"lux", "temp"};
int fieldData[NUM_FIELDS];

//////////////////////
// Input Pins, Misc //
//////////////////////
const int triggerPin = 3;
const int lightPin = A1;
const int tempPin = A2;

float tempC;
int reading;
//String name = "Ether-anon";
String name = "Roy";
boolean newName = true;

void setup()
{
  Serial.begin(115200);

  // Setup Input Pins:
  pinMode(triggerPin, INPUT_PULLUP);
  pinMode(lightPin, INPUT_PULLUP);
  pinMode(tempPin, INPUT_PULLUP);

  // Set Up Ethernet:
  setupEthernet();

  Serial.println(F("=========== Ready to Stream ==========="));
  Serial.println(F("Press the button (D3) to send an update"));
#if 0 // don't use
  Serial.println(F("Type your name (no spaces!), followed by '!' to update name"));
#endif
}

void loop()
{
  // If the trigger pin (3) goes low, send the data.
  if (!digitalRead(triggerPin))
  {
    // Gather data:
        fieldData[0] = analogRead(lightPin);
        fieldData[1] = analogRead(tempPin);
    //fieldData[2] = name;

    Serial.println("Posting!");
    postData(); // the postData() function does all the work,
                // check it out below.

    delay(1000);
  }
#if 0 // don't use
  // Check for a new name input:
  if (Serial.available())
  {
    char c = Serial.read();
    if (c == '!')
    {
      newName = true;
      Serial.print("Your name is ");
      Serial.println(name);
    }
    else if (newName)
    {
      newName = false;
      name = "";
      name += c;
    }
    else
    {
      name += c;
    }
  }
#endif
}

void postData()
{
  // Make a TCP connection to remote host
  if (client.connect(server, 80))
  {
    // Post the data! Request should look a little something like:
    // GET /input/publicKey?private_key=privateKey&light=1024&switch=0&name=Jim HTTP/1.1\n
    // Host: data.sparkfun.com\n
    // Connection: close\n
    // \n
    client.print("GET /input/");
    client.print(publicKey);
    client.print("?private_key=");
    client.print(privateKey);
    for (int i=0; i<NUM_FIELDS; i++)
    {
      client.print("&");
      client.print(fieldNames[i]);
      client.print("=");
      client.print(fieldData[i]);
    }
    client.println(" HTTP/1.1");
    client.print("Host: ");
    client.println(server);
    client.println("Connection: close");
    client.println();
  }
  else
  {
    Serial.println(F("Connection failed"));
  }

  // Check for a response from the server, and route it
  // out the serial port.
  while (client.connected())
  {
    if ( client.available() )
    {
      char c = client.read();
      Serial.print(c);
    }
  }
  Serial.println();
  client.stop();
}

void setupEthernet()
{
  Serial.println("Setting up Ethernet...");
  // start the Ethernet connection:
  if (Ethernet.begin(mac) == 0) {
    Serial.println(F("Failed to configure Ethernet using DHCP"));
    // no point in carrying on, so do nothing forevermore:
    // try to congifure using IP address instead of DHCP:
    Ethernet.begin(mac, ip);
  }
  Serial.print("My IP address: ");
  Serial.println(Ethernet.localIP());
  // give the Ethernet shield a second to initialize:
  delay(1000);
}
Demo:
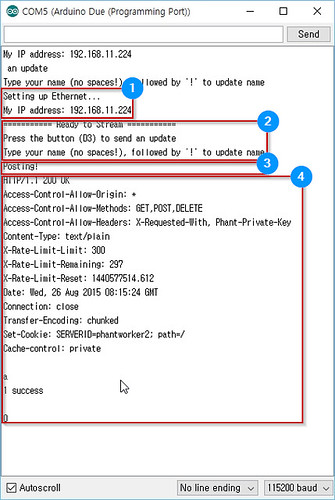
Serial Monitor
- DHCP Clinet message
- Press the button to send query to server, then postData() is called.
- Confirm the response message
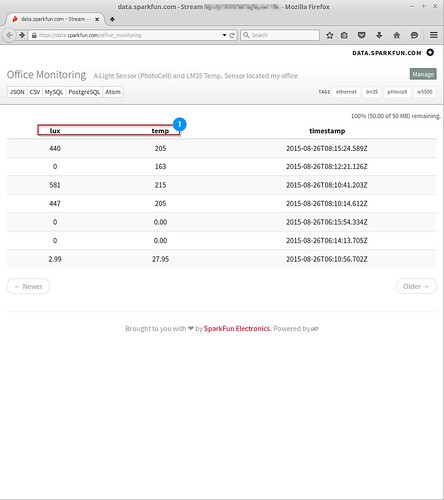
https://data.sparkfun.com/office_monitoring
Before sending query

After sending query : lux and temp are filed names.