2015년 7월 6일 월요일

UdpNtpClient

UDP NTP Client

NTP

*Network Time Protocol - wikipedia
NTP

*참조:https://blog.cloudflare.com/understanding-and-mitigating-ntp-based-ddos-attacks/

Do UdpNtpClient

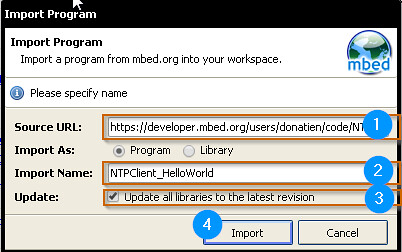
  1. Import Program NTPClinet_HelloWorld: “http://developer.mbed.org/users/embeddist/code/UdpNtpClient/
    2015-07-06_15-22-24

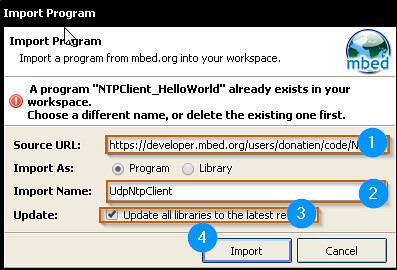
  2. if same program is existed, Import Name of NTPClinet_HelloWorld will be changed(2).
    2015-07-06_15-23-39

  3. Remove mbed-rtos and EthernetInterface

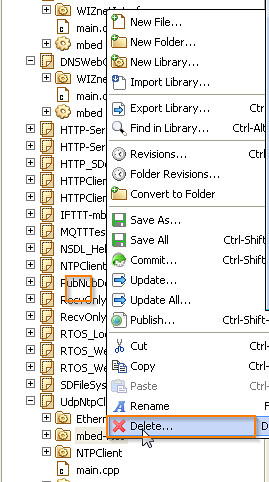
    • Remove mbe-rtos
      2015-07-06_15-25-15
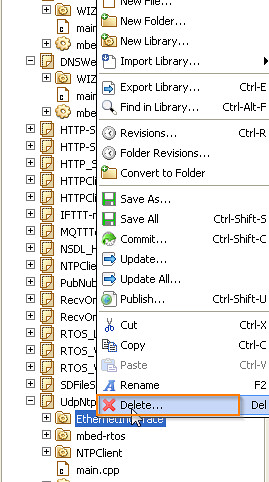
    • Remove EethernetInterface
      2015-07-06_15-25-25
    • Directory after removing mbed-rtos & EthernetInterface
      2015-07-06_15-26-46
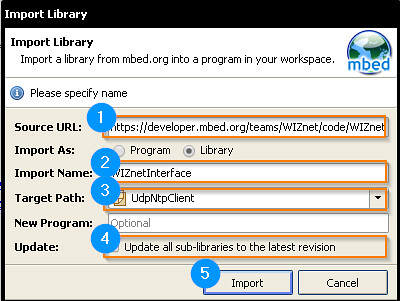
  4. Import WIZnetInterface”https://developer.mbed.org/teams/WIZnet/code/WIZnetInterface/"(1)
    2015-07-06_15-28-12

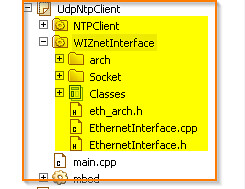
  5. Dirctory for UdpNtpClient
    2015-07-06_15-29-11

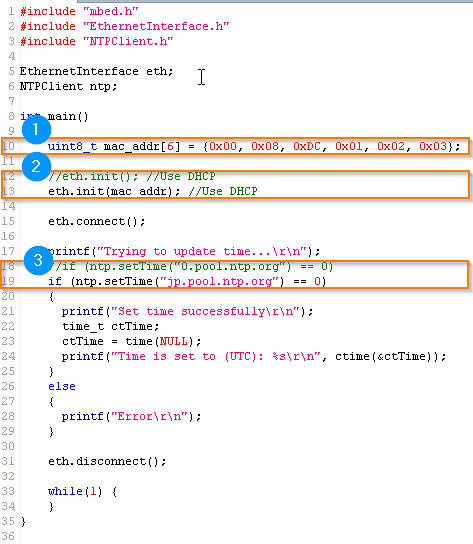
  6. Make Codes: porting to WIZnetInterface from EthernetInterface

    • Add arrange for MAC address, call init(mac_addr) for initialing ethernet class.
      2015-07-06_15-47-20
  7. UDP APIs in WIZnetInterface

    • NTPClient.cpp\Bind() in UDP
      2015-07-06_15-55-19

    • NTPClient.cpp\sendTo(): send in UDP
      2015-07-06_15-52-14

    • NTPClient.cpp\receiveFrom(): recv in UDP
      2015-07-06_15-52-41

    • NTPClient.cpp\Close() in UDP
      2015-07-06_15-54-43

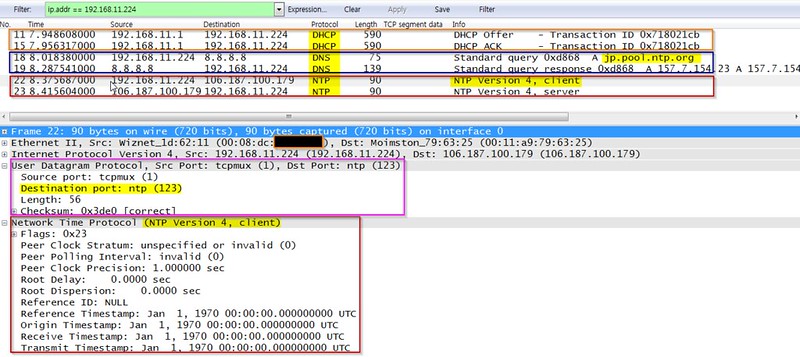
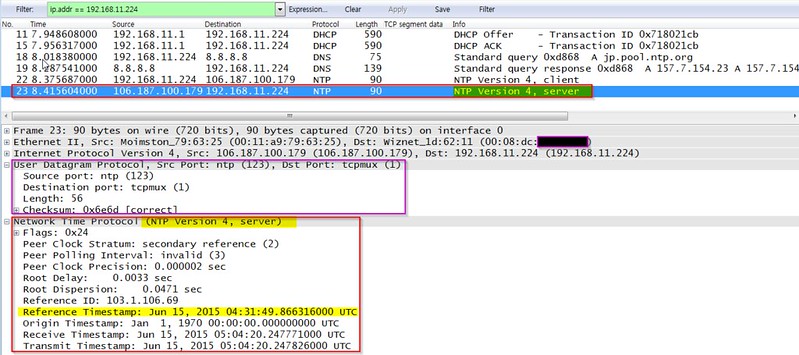
  8. Confirm packets by WireShark

    • NTP version 4, clinet
      2015-07-06_17-15-36
    • NTP version 4, server
      2015-07-06_17-15-50

Code Repository

I will update…

Ref. Code

#include "mbed.h"
#include "EthernetInterface.h"
#include "NTPClient.h"

EthernetInterface eth;
NTPClient ntp;

int main() 
{
    uint8_t mac_addr[6] = {0x00, 0x08, 0xDC, 0x01, 0x02, 0x03};

    //eth.init(); //Use DHCP
    eth.init(mac_addr); //Use DHCP

    eth.connect();

    printf("Trying to update time...\r\n");
    //if (ntp.setTime("0.pool.ntp.org") == 0)
    if (ntp.setTime("jp.pool.ntp.org") == 0)
    {
      printf("Set time successfully\r\n");
      time_t ctTime;
      ctTime = time(NULL);
      printf("Time is set to (UTC): %s\r\n", ctime(&ctTime));
    }
    else
    {
      printf("Error\r\n");
    } 

    eth.disconnect();  

    while(1) {
    }
}

2015년 7월 5일 일요일

DNSWebClient

DNS Web Client

자세한 사항은 아래의 링크와 그림을 참고 한다.

DNS

  • DNS-wikipedia
    DNS
    *참고:http://www.routercheck.com/wp-content/uploads/2014/03/dns-and-ipv6-470x282.jpg

    HTTP

  • HTTP-wikipedia
    HTTP
    *참고:http://codegangsta.gitbooks.io/building-web-apps-with-go/content/http_basics/http_diagram.png

Do DnsWebClient

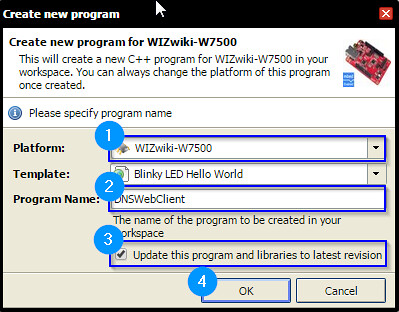
  1. Create New Program as DNS Web Client
    2015-07-03_14-49-16
  2. Confirm the created program
    2015-07-03_14-49-44
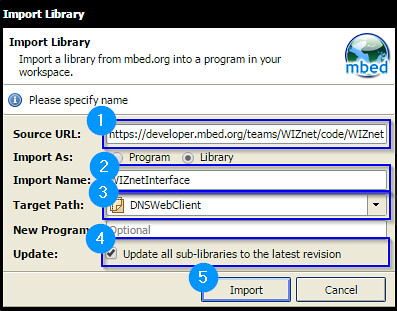
  3. Import WIZnetInterface by using Import Wizard:”https://developer.mbed.org/teams/WIZnet/code/WIZnetInterface/"(1)
    2015-07-03_14-52-50
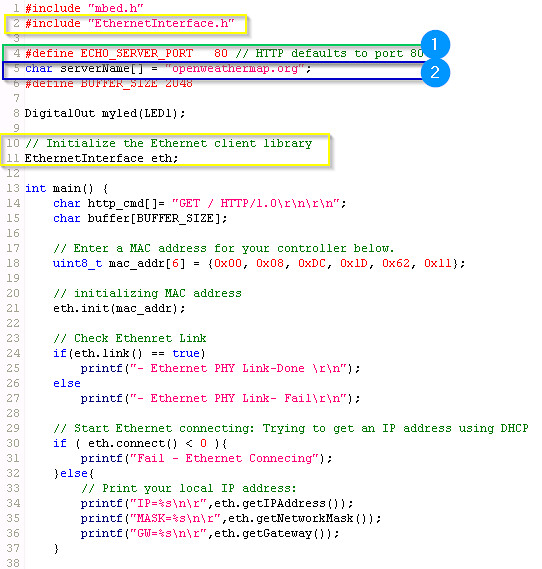
  4. Make Codes

    • Set DHCPclient, Sourtce port and Domain name server
      2015-07-06_13-08-46
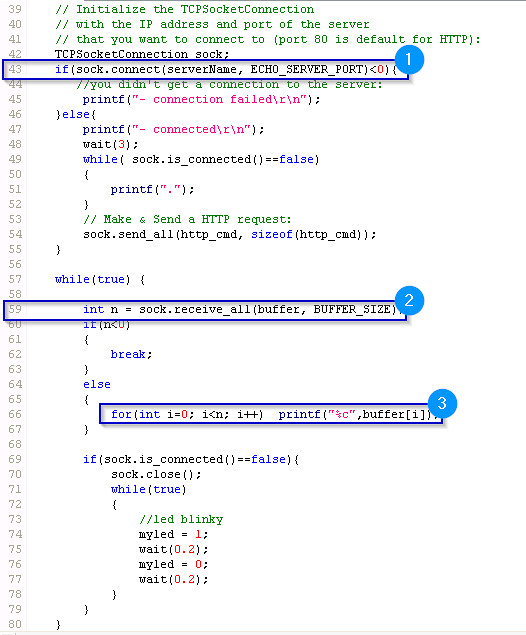
    • TCP-connection, TCP-recv and Display received data
      2015-07-06_13-09-22
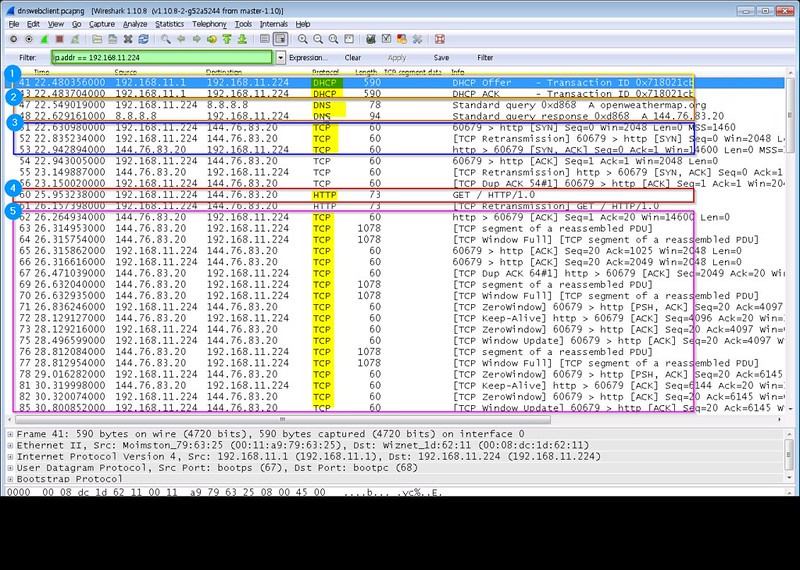
  5. Confirm packets bye WireShark
    5.1 DHCP complite
    5.2 DNS handshake between Clinet and DNS server
    5.3 TCP-Connection between Clinet and HTTP server
    5.4 Request HTTP GET
    5.5 RECV TCP DATA: HTTP page
    2015-07-06_11-26-47

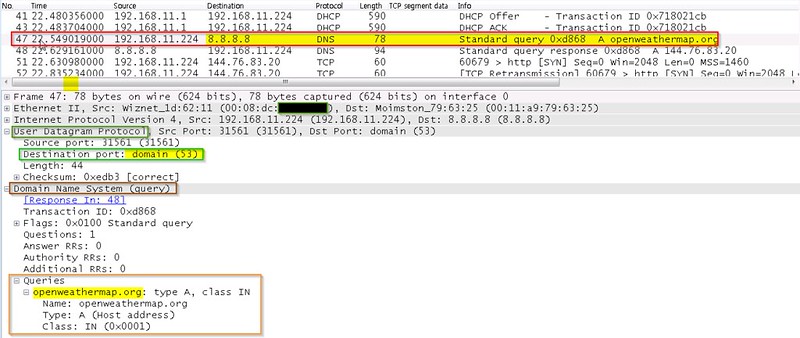
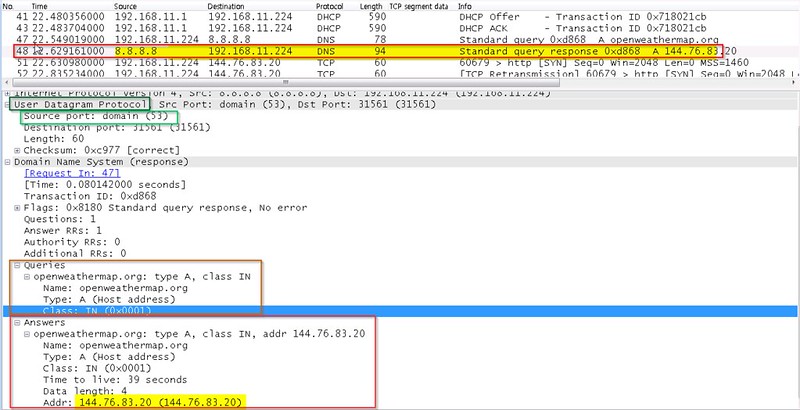
  6. DNS packet

    • 5.1 DNS Request
      2015-07-06_12-55-45
    • 5.2 DNS Reponse
      2015-07-06_12-56-51
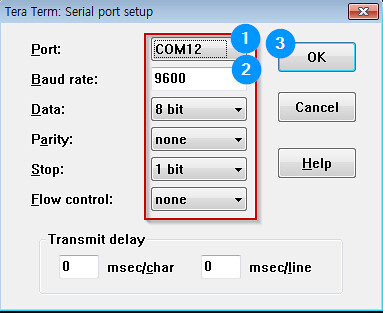
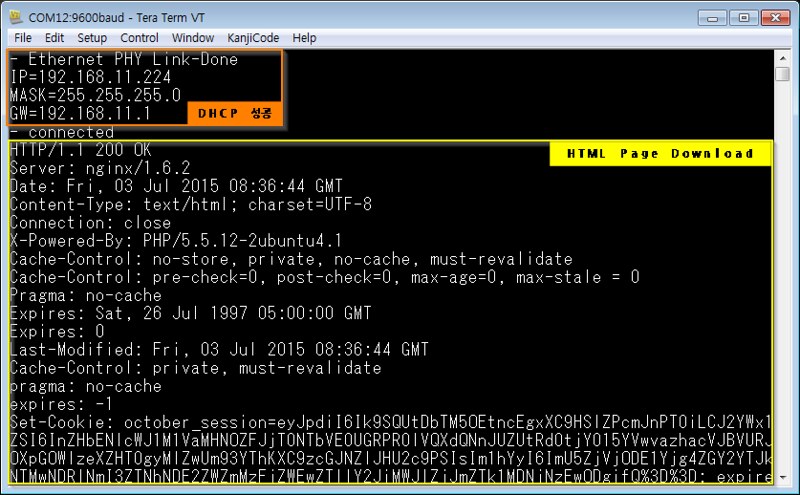
  7. Confirm Serial Teminal

    • Set Serial teminal
      2015-07-03_13-07-00
    • Display
      2015-07-03_17-40-38

Code Repository

https://developer.mbed.org/users/embeddist/code/DNSWebClient/

Ref. Code

#include "mbed.h"
#include "EthernetInterface.h"

#define ECHO_SERVER_PORT   23 // telnet defaults to port 23

DigitalOut myled(LED1);

// Initialize the Ethernet client library
EthernetInterface eth;

int main() {
    // Enter a MAC address for your controller below.
    uint8_t mac_addr[6] = {0x00, 0x08, 0xDC, 0x00, 0x01, 0x02}; 

    // initializing MAC address
    eth.init(mac_addr);

    // Check Ethenret Link
    if(eth.link() == true)
        printf("- Ethernet PHY Link-Done \r\n");
    else
        printf("- Ethernet PHY Link- Fail\r\n");

    // Start Ethernet connecting: Trying to get an IP address using DHCP
    if ( eth.connect() < 0 )
        printf("Fail - Ethernet Connecing");
    else
    {
        // Print your local IP address:
        printf("IP=%s\n\r",eth.getIPAddress());
        printf("MASK=%s\n\r",eth.getNetworkMask());
        printf("GW=%s\n\r",eth.getGateway());
    }        

    TCPSocketServer server;
    server.bind(ECHO_SERVER_PORT);
    server.listen();

    while (true) {
        printf("\nWait for new connection...\n\r");
        TCPSocketConnection client;
        server.accept(client);
        //client.set_blocking(false, 1500); // Timeout after (1.5)s

        printf("Connection from: %s\n\r", client.get_address());
        char buffer[256];
        while (true) {
            int n = client.receive(buffer, sizeof(buffer));
            if (n <= 0) break;

            // print received message to terminal
            buffer[n] = '\0';
            printf("Received message from Client :'%s'\n\r",buffer);

            // reverse the message
            char temp;
            for(int f = 0, l = n-1; f<l; f++,l--){
                temp = buffer[f];
                buffer[f] = buffer[l];
                buffer[l] = temp;
                }

            // print reversed message to terminal
            printf("Sending message to Client: '%s'\n\r",buffer);

            // Echo received message back to client
            client.send_all(buffer, n);
            if (n <= 0) break;
        }

        client.close();

        //led blinky
        myled = 1;
        wait(0.2);
        myled = 0;
        wait(0.2);
    }
}

DHCPChatServer

DHCP Chat Server

TCP

TCP의 자세한 내용은 아래의 링크와 플로우챠트를 참조한다.

TCP

Do DhcpChatServer

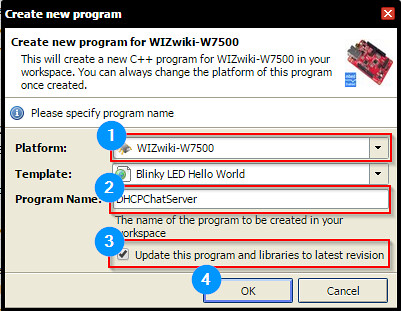
  1. Create New Program as DHCP Chat Server
    2015-07-03_11-25-08
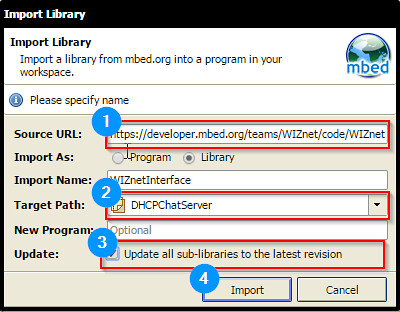
  2. Import WIZnetInterface by using Import Wizard:”https://developer.mbed.org/teams/WIZnet/code/WIZnetInterface/"(1)
    2015-07-03_11-28-12
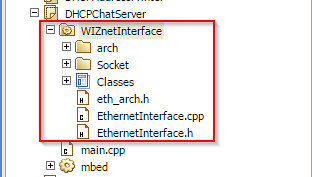
  3. Confirm the created program (mbed: mbed.lib, main.c:blinky_led, WIZnetInterface: ethernet interface)
    2015-07-03_12-47-27
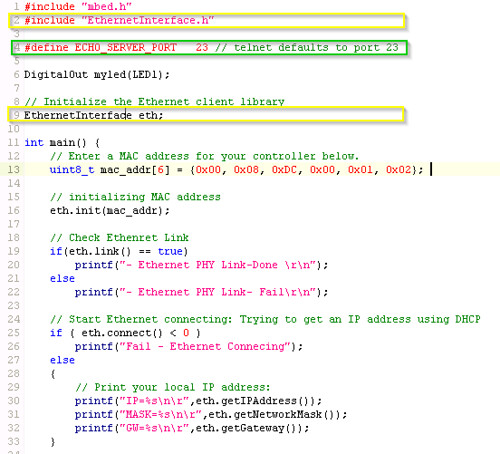
  4. Make codes

    • DHCPClient Setting, Define Source port
      2015-07-06_13-40-20
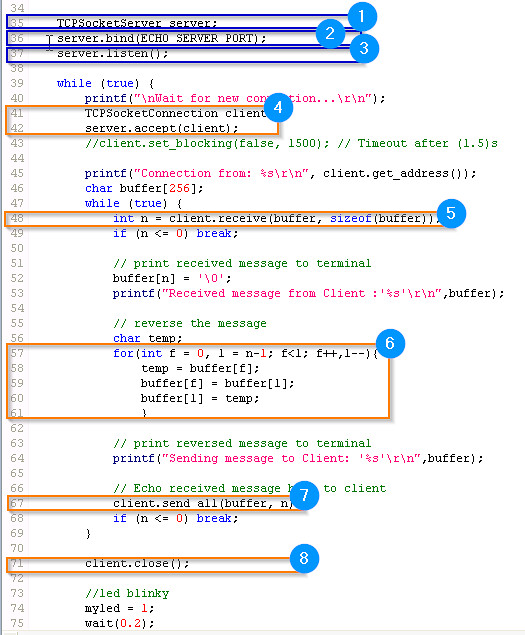
    • TCP server codes
      2015-07-06_13-35-41
  5. Set serial teminal for teraterm
    2015-07-03_13-07-00

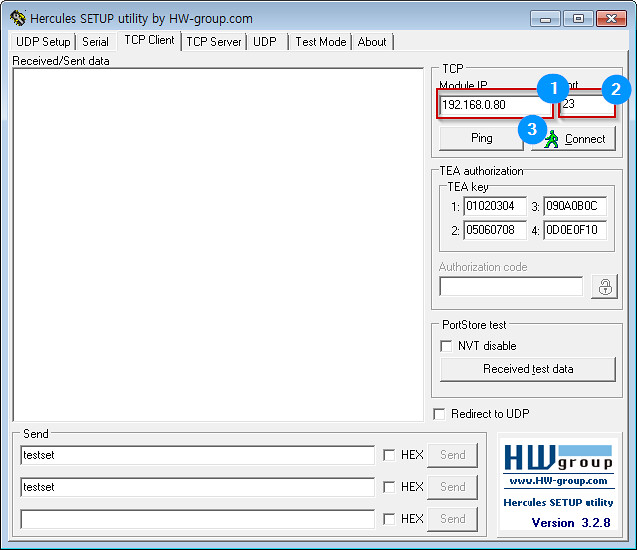
  6. Set TCP client by using hercules
    2015-07-03_13-07-25

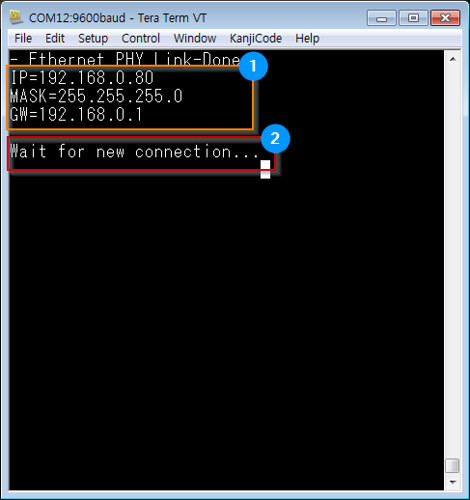
  1. Display

    • Step1: success DHCP client and wait tcp client.
      2015-07-03_12-59-44

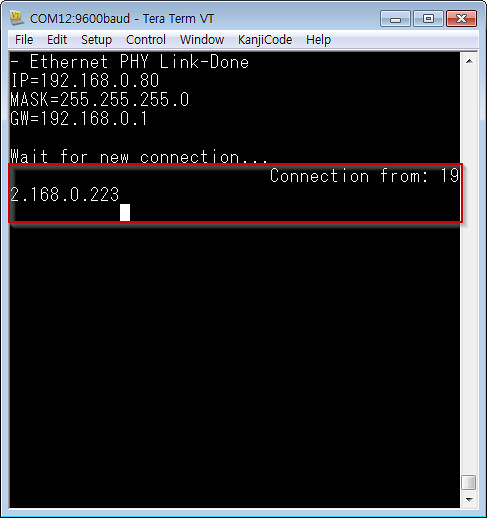
    • Step2: Complete TCP-connection from hecules(TCP client)
      2015-07-03_13-17-34

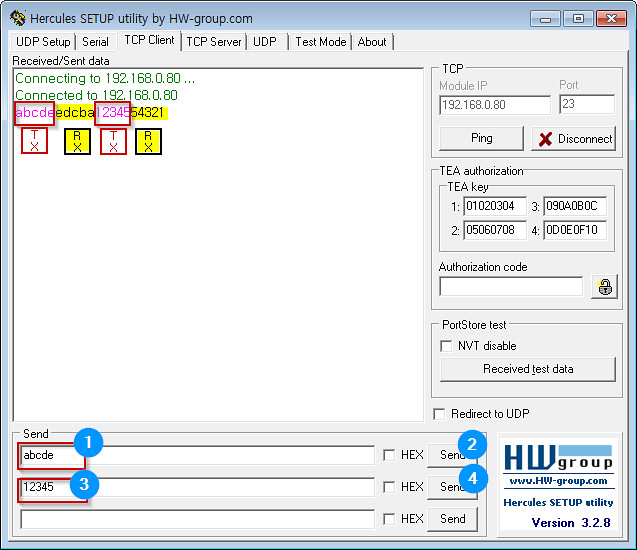
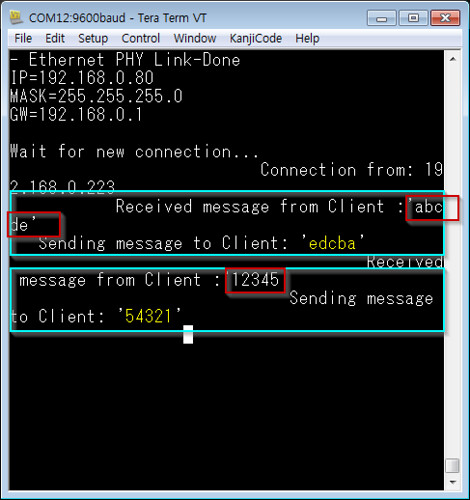
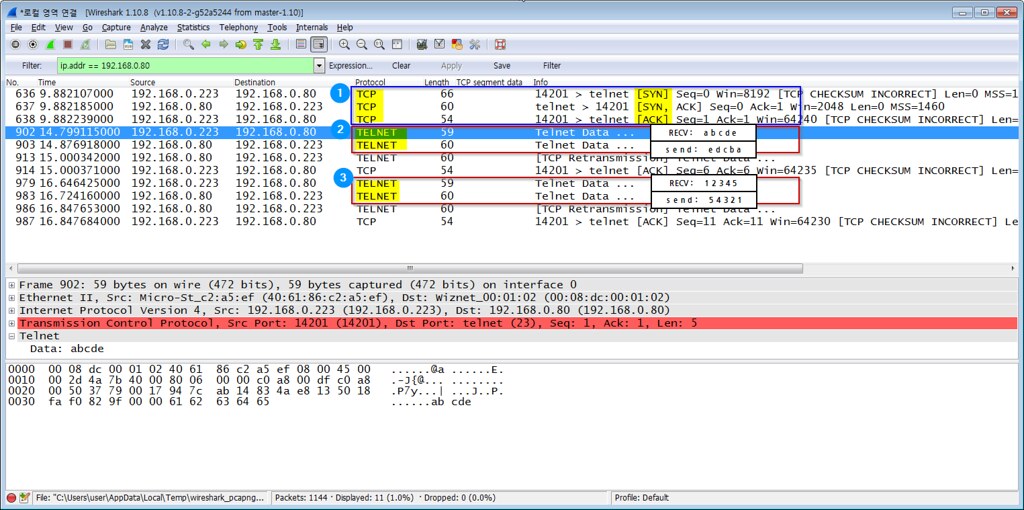
  1. Confirm sent data and received data
    • on hecules
      2015-07-03_13-19-39
    • on teraterm
      2015-07-03_13-19-43
    • on Wireshark (Packet Capture)
      2015-07-03_13-25-55

Code Repositroy

http://developer.mbed.org/users/embeddist/code/DHCPChatServe

Rer. Code

#include "mbed.h"
#include "EthernetInterface.h"

#define ECHO_SERVER_PORT   23 // telnet defaults to port 23

DigitalOut myled(LED1);

// Initialize the Ethernet client library
EthernetInterface eth;

int main() {
    // Enter a MAC address for your controller below.
    uint8_t mac_addr[6] = {0x00, 0x08, 0xDC, 0x00, 0x01, 0x02}; 

    // initializing MAC address
    eth.init(mac_addr);

    // Check Ethenret Link
    if(eth.link() == true)
        printf("- Ethernet PHY Link-Done \r\n");
    else
        printf("- Ethernet PHY Link- Fail\r\n");

    // Start Ethernet connecting: Trying to get an IP address using DHCP
    if ( eth.connect() < 0 )
        printf("Fail - Ethernet Connecing");
    else
    {
        // Print your local IP address:
        printf("IP=%s\n\r",eth.getIPAddress());
        printf("MASK=%s\n\r",eth.getNetworkMask());
        printf("GW=%s\n\r",eth.getGateway());
    }        

    TCPSocketServer server;
    server.bind(ECHO_SERVER_PORT);
    server.listen();

    while (true) {
        printf("\nWait for new connection...\n\r");
        TCPSocketConnection client;
        server.accept(client);
        //client.set_blocking(false, 1500); // Timeout after (1.5)s

        printf("Connection from: %s\n\r", client.get_address());
        char buffer[256];
        while (true) {
            int n = client.receive(buffer, sizeof(buffer));
            if (n <= 0) break;

            // print received message to terminal
            buffer[n] = '\0';
            printf("Received message from Client :'%s'\n\r",buffer);

            // reverse the message
            char temp;
            for(int f = 0, l = n-1; f<l; f++,l--){
                temp = buffer[f];
                buffer[f] = buffer[l];
                buffer[l] = temp;
                }

            // print reversed message to terminal
            printf("Sending message to Client: '%s'\n\r",buffer);

            // Echo received message back to client
            client.send_all(buffer, n);
            if (n <= 0) break;
        }

        client.close();

        //led blinky
        myled = 1;
        wait(0.2);
        myled = 0;
        wait(0.2);
    }
}

DHCPAddressPrinter

DHCPAddressPrinter

Dynamic Host Configuration Protocol

DHCP의 자세한 내용은 아래의 링크를 참조한다.
Wikipedia:Dynamic Host Configuration Protocol

DHCP를 사용할때 필요한 개념들을 정성적으로 이해하고 실제로 Router(DHCP Server)와 ARMmbed Platform(DHCP Client)의 관계를 알아보자. 또한, 궁극적으로 ARMmbed Platform의 WIZnetInterface에서 어떻게 DHCP를 설정하고 사용하는 지 초점을 맞춘다.

DHCP 왜 사용하나?

  • Dynamic Host Configuration Protocol의 정의 처럼 동적으로 Host의 IP address를 설정하여 사용할 수 있도록한다.
  • 목적은 Network상에서 Network Administrator 과 일반 Network User가 manual로 설정을 줄이는 것이다.

우리가 일상생활에서 흔히 경험하는 가장 쉬운 예로 들어보자. Smart phone을 유무선공유기(Access Point)에 접속할때 AP의 SSID선택하고 Password 입력하면 “IP를 받아오는 중”이라는 는 문구를 볼 수 있다. 이것은 Smart Phone(DHCP Client)이 AP(DHCP Server)로 부터 IP address 할당 받는 것을 뜻한다.

우리는 DHCP server 부터 할당 받은 IP address가 무엇인지, 할당 받은 IP address를 언제까지 사용할 수 있는지 등과 같은 것들을 생각하지 않아도 된다. 이것이 DHCP를 사용하는 이유이다.

단지, 이때 주의해야 할 것은 AP가 WAN (Wide Area Network) Port로의 설정이 Internet이 가능하도록 설정되어 있냐는 것이다. AP로 부터 IP address를 할당받았으나 Google이나 Naver의 접속이 안되는 경우 즉, Internet이 안 될때가 이 경우이다. 이것을 이해하려면 공유기의 NAT기능을 알아야 한다.

  • Network Address Translation (NAT)
    일반적으로 공유기 NAT 기능을 지원한다. NAT는 Local network IP address와 Internet IP address를 Translation해주는 기능이다. 아래의 그림과 같이 NAT(공유기)는 DHCP server로 동작하여 Local network에 있는 모든 Host들에 대해 DHCP IP address를 할당한다. 그리고 NAT가 Internet Service Provider(ISP, 쉽게말해 KT, U+)로 부터 IP address를 할당 받았다면, 이 해당 NAT는 인터넷에 접속이 가능하다. 다시말하면, NAT에 연결된 모든 Host들은 Internet에 접속 할 수 있다.

    출처: http://www.h3c.com/portal/res/200808/06/20080806_659082_image001_613642_57_0.gif
    NAT의 구체적인 원리는 위의 그림에서 NAT table을 이해하면 좀 더 쉽게 알 수 있다. 이 NAT table은 Host(10.1.1.100:8)이 연결되어 있으며 외부의 Server(211.100.7.34:24)로 접속을 한 경우를 보여준다. Host는 DHCP IP address를 할당받아 Server에 자신의 Local IP address로 접속 할 수가 없다. 이때 Host는 NAT의 IP transtation기능을 이용하여 NAT의 IP address (162.105.178.65)를로 외부의 (WAN/Internet)에 연결되어 있는 Server에 접속이 가능해진다. 반대로 Server입장에서는 Host의 IP Address는 알 수 없고 NAT의 IP address만 인식할 수 있다.

How to use DHCP in WIZnetInterface ?

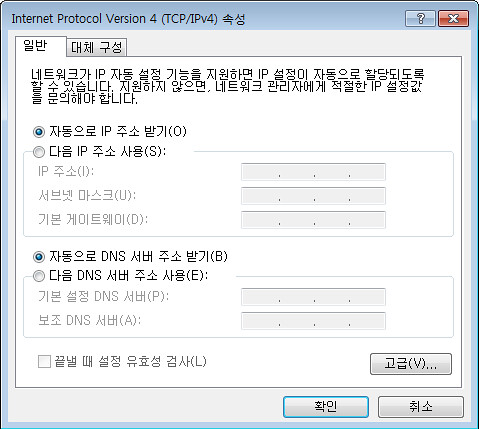
  • OS기반의 PC에서 DHCP를 설정한다면 아래와 같이 아주 간단하게 설정 할 수 있다.
      PC상에서 DHCP를 설정하기 일반적으로  WINDOWS를 쓴다면 아래의 그림과 같이 **제어판>>네트워크 및 인터넷>>네트워크 및 공유 센터>>로컬영역연열>>로컬영역상태>>속성>>Internet Protocol Version 4(TCP/IP속성)**에서 '자동으로 IP 주소 받기'를 클릭한다. 끝!
    
    2015-07-02_14-41-34

하지만, Embedded System의 경우 일일이 Developer가 설정해야 한다.

  • 이제부터 WIZnetInterface의 DHCP Client를 사용해보자
    • 준비단계
      • Network 구축: 공유기의 DHCP Server기능을 활성화하고 해당 공유기에 Target board(WIZwiki_W7500)와 PC를 연결한다.
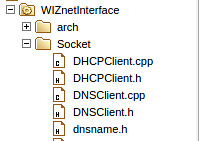
      • DHCPClient코드/Library: WIZnetInterface에 DHCPClient Library를 포함하고 있다.
        dhcpdns

Do DHCPAddressPrinter

  1. Create New Program as DHCPAddressPrinter
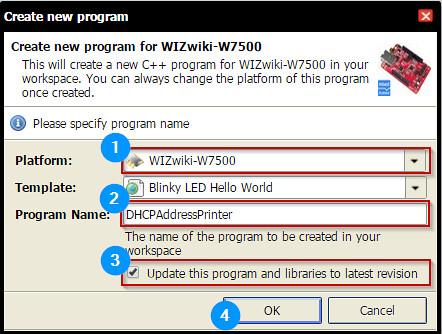
    2015-07-03_09-35-41
  2. Confirm the created program (mbed: mbed.lib, main.c:blinky_led)
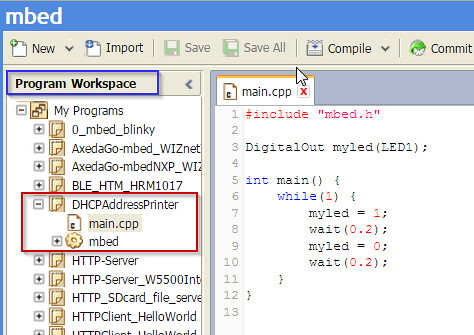
    2015-07-03_09-49-33
  3. Import WIZnetInterface by using Import Wizard:”https://developer.mbed.org/teams/WIZnet/code/WIZnetInterface/"(1)
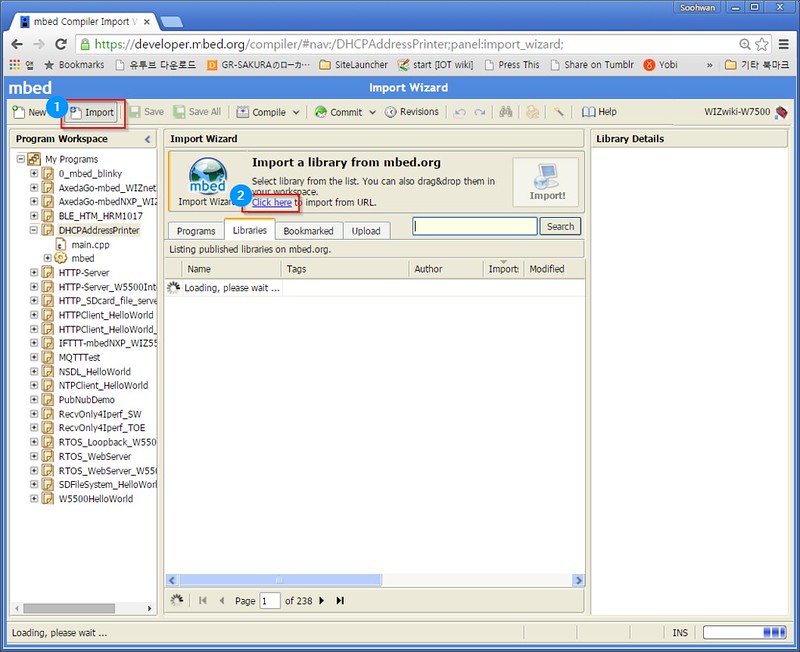
    2015-07-03_09-51-36
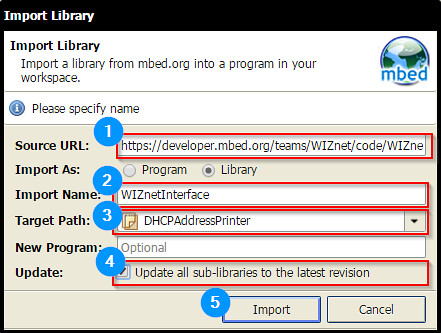
  4. Set Import Library
    2015-07-03_09-56-16
  5. Confirm the imported WIZnetInterface library
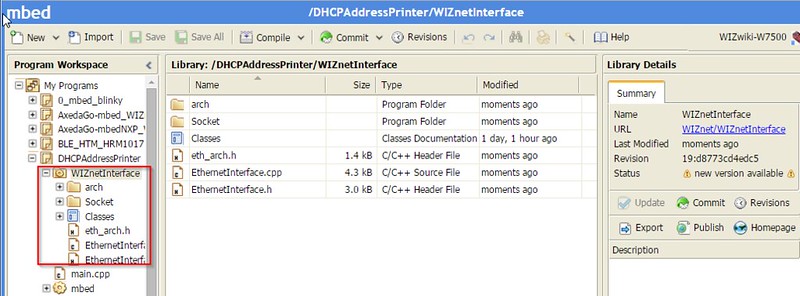
    2015-07-03_09-57-27
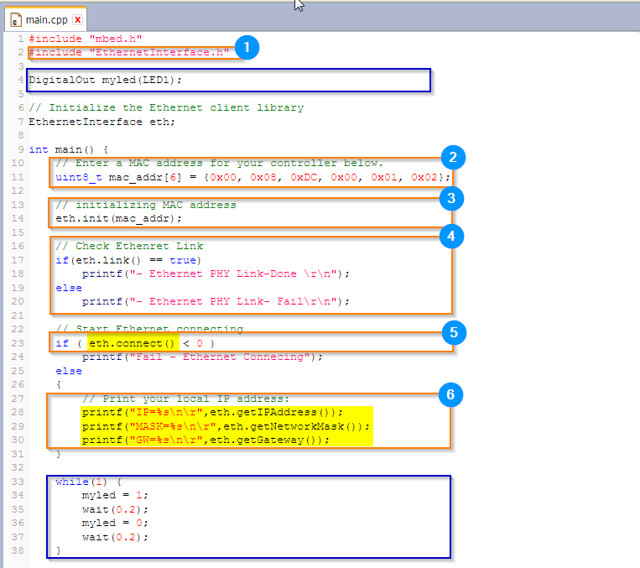
  6. Make Codes
    2015-07-03_10-32-05
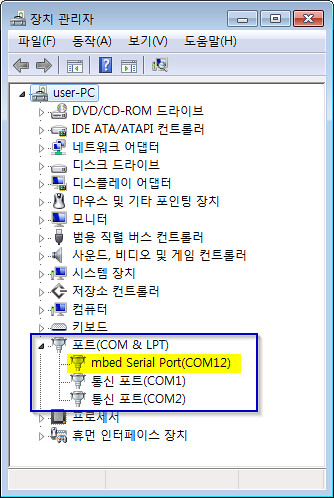
  7. Confirm COM port for mbed platform
    2015-07-03_10-49-53
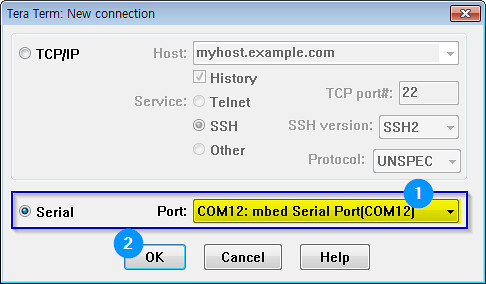
  8. Set serial port for teraterm
    2015-07-03_10-51-10
  9. Display the IP address allocated from DHCP server
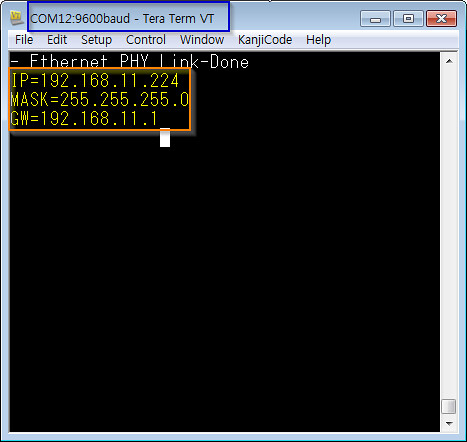
    2015-07-03_10-51-54
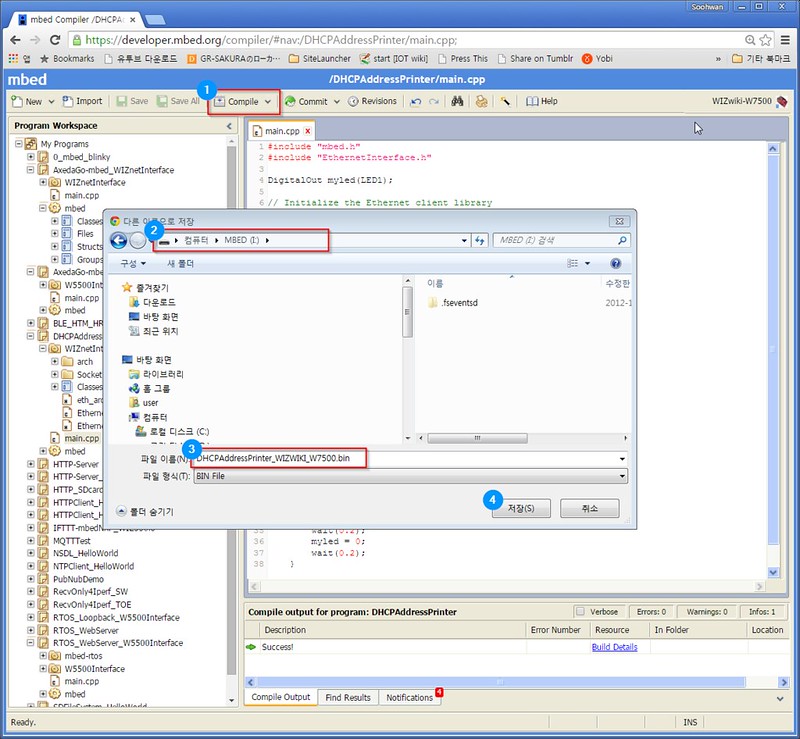
  10. Download bin files from WebIDE
    2015-07-03_10-54-44

Code Repository on ARMmbed

http://developer.mbed.org/users/embeddist/code/DHCPAddressPrinter/

Code

#include "mbed.h"
#include "EthernetInterface.h"

DigitalOut myled(LED1);

// Initialize the Ethernet client library
EthernetInterface eth;

int main() {
    // Enter a MAC address for your controller below.
    uint8_t mac_addr[6] = {0x00, 0x08, 0xDC, 0x00, 0x01, 0x02}; 

    // initializing MAC address
    eth.init(mac_addr);

    // Check Ethenret Link
    if(eth.link() == true)
        printf("- Ethernet PHY Link-Done \r\n");
    else
        printf("- Ethernet PHY Link- Fail\r\n");

    // Start Ethernet connecting
    if ( eth.connect() < 0 )
        printf("Fail - Ethernet Connecing");
    else
    {
        // Print your local IP address:
        printf("IP=%s\n\r",eth.getIPAddress());
        printf("MASK=%s\n\r",eth.getNetworkMask());
        printf("GW=%s\n\r",eth.getGateway());
    }        
    while(1) {
        myled = 1;
        wait(0.2);
        myled = 0;
        wait(0.2);
    }
}