2014년 11월 20일 목요일

souliss

souliss


souliss


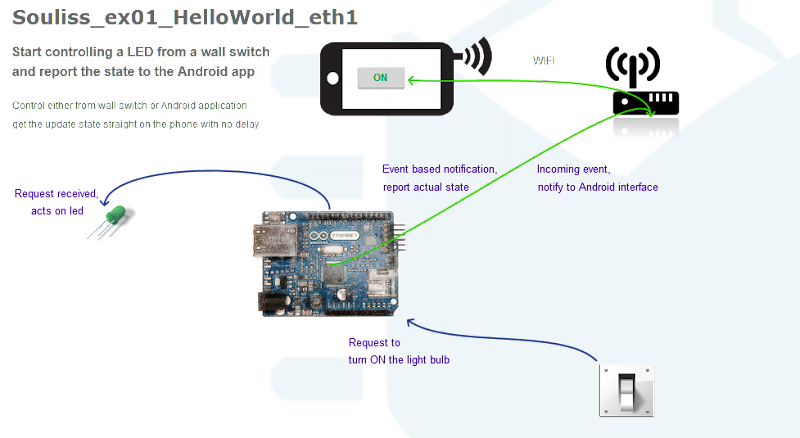
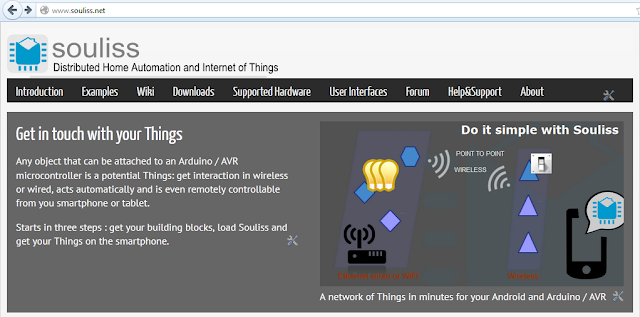
Distributed Framework for Home Automation and Internet of Things


What's Souliss?


It’s an open source framework which runs over multiple platfoms crossing different the phy layer, as like WiFi, Wireless, and ethernet.

Souliss can not only control and monitor your networked objects, but also share datas and have the trigger-based action from the shared data.

Platform for Souliss


  • Supports Hardware Platform

  • Arduino Boards

  • KMTronic DINo

  • Olimex AVR / OLIMEXINO boards

  • AirQ Network Boards


  • Tranceiver


  • AT86RF230

  • Nordic nRF24L01 and RF24L01+

  • WIZnet W5100 / W5200/ W5500

  • Micodhip ENC28J60


Souliss's Materials


https://code.google.com/p/souliss/

Connect Arduino to PubNub

See more at: Connect Arduino to PubNub in 2 Steps

PubNub is a provider of APIs that publishers as like Temboo.
Developers and Makers can use to implement messaging on cloud websites and SNS Apps by usin PubNub API.

PunNub


The PubNub Data Stream Network powers thousands of apps, streaming 50 billion messages to 150 million devices a month..


This tutorial explains the steps to connect an Arduino to the PubNub Data Stream Network.
STEP 1: Connect the Arduino to a monitor, keyboard, mouse and ethernet cable.

STEP 2: You’ll need to sign up for a PubNub account. Once you sign up, you can get your unique PubNub keys in the PubNub Developer Portal. Be sure to input your unique publish/subscribe keys!


  • See more at: http://www.pubnub.com/blog/connect-arduino-to-pubnub-in-2-steps/#sthash.wWXsj7bC.dpuf


In this tutorial, Arduino Ethernet Shield is provides the Internet connectivity.
Arduino mega + Ethernet Shield

2014년 11월 18일 화요일

Tip2 – Arduino COM Port확인하기

ArduinoNote List-page

Sketch IDE 1.5.x 버젼을 설치하면 USB-to-Serial Driver가 함께 설치된다.
Sketch IDE설치 이후 Arduino Board와 PC를 USB cable로 연결하면 USB-to-Serial Driver가 Arduino를 Serial Port인식하게된다.

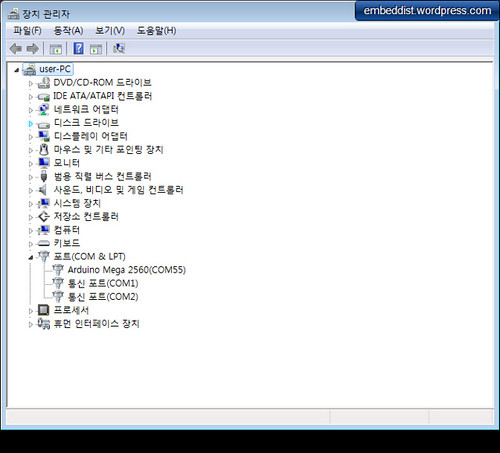
OS가 Windows일 경우 아래와 같이 장치관리자의 COM port부분에 Arduino MEGA 2560(COM55)처럼 인식되는 것을 확인 할 수 있다.
Arduino COM port

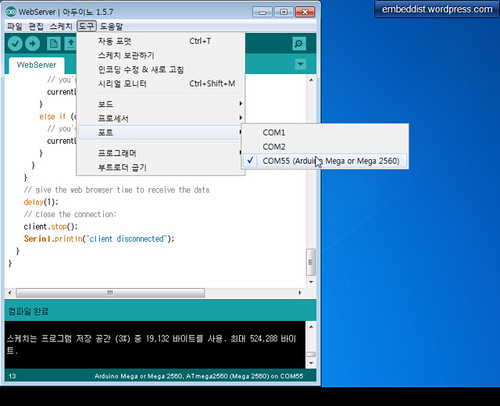
위와 같이 정상적으로 설치되었다면 Sketch IDE에서 Port를 아래와 같이 설정할 수 있다.
port setting on Sketch IDE

Tip1 - MAC / IP / DNS server address, Subnet mask, Default gateway

ArduinoNote List-page

MAC address


Madia Access Control address (MAC address)는 Physical network의 통신을 위해 TCP/IP Network interface에 할당되는 unique idedtifier다.

MAC address는 6개의 2자리 hexadecimal digit으로 구성되며, 보통 colon ':'으로 구분된다.
e.g. 01-23-45-67-89-AB or 01:23:45:67:89:AB

MAC Address)

IP address


  • IP address는 Network 상에서 Host를 구별할 수 있는(uniquely identify) 32bit의 수이다.

  • 32bit을 수를 통상적으로 dotted-decimal format으로 표현한다.

    32bit format : 11000000101010000000000100000100
    Dotted-32bit format : 11000000.10101000.00000001.00000100
    Dotted-decimal format: 192.168.1.4


Subnet mask


  • Subnet mask는 Local network(자신이 속한 network)인지 Remote network인지를 판단 할 때 쓰인다.


  • 만약, Subnet mask가 255.255.255.0이라고 가정할 경우

    11111111.11111111.11111111.00000000: Subnet mask (255.255.255.0)


  • 이때, IP address는 192.168.1.4라고 하면

    11000000.10101000.00000001.00000100 : IP address (192.168.1.4)
    11111111.11111111.11111111.00000000 : Subnet mask (255.255.255.0)


  • subnet이 앞에서부터 24Bit만 '1'이있으므로 이값을 IP address에 mask씌우면 그값이 바로 Network ID가 된다.

    11000000.10101000.00000001.00000100 : Network address (192.168.1.0)


  • subnet의 뒤부분의 8Bit의 나머지부분에 대응되는 IP address가 바로 Host address가 된다.

    00000000.00000000.00000000.00000100 : Host address (0.0.0.4)


  • 따라서, 어떤 packet이 192.168.1.4의 IP address를 갖고, subnet이 192.168.1.0일 경우에만 Host는 그 Packet를 자신의 packet으로 수신하여 처리할 수 있다.


  • Subnet mask에는 룰이 있는데 32bit중 왼쪽에는 '1'채우고 오른쪽은 '0'으로 채워야만한다.

    255.255.255.128 11111111.11111111.11111111.10000000
    255.255.255.192 11111111.11111111.11111111.11000000
    255.255.255.224 11111111.11111111.11111111.11100000
    255.255.255.240 11111111.11111111.11111111.11110000


subnet mask
* http://www.itgeared.com/articles/1054-how-ip-packets-are-routed-on-local-area/

Default gateway


다른 Network의 Host와 통신하는 경우 Router라고 하는 장비를 거쳐 통신을 하게 되는데 이 장비를 Default gateway라고 한다. 다시말해, 다른 Network와 Host's의 subnet를 Link해주는 장비이다. 따라서 Host가 다른 Network에 있는 특정Host에세 packet을 전송할 경우 Default gateway주소를 사용하여 전송할 수 있다.

DNS server address


Domain Name System (DNS)는 TCP/IP Network에서 사용하는 IPaddress와 www.host.com과 Domain을 maping 시키는 Name service를 가르키며, DNS address는 Name service Server를 말한다.
아래는 Domain name이 DNS server를 통해 IP address로 변경되는 과정을 보여준다.

www.host.com (Domain name)
8.8.8.8 (DNS server address)


192.168.123.123 (www.host.com의 IP address)

Port number


동일한 IP address상에서 application/process/service를 구별하기 위한 16bit number이다.
port number list @ iana.org
port number

Note9 – WebServer controlled LED Sketch

ArduinoNote List-page
PREVIOUS: Note8 - WebServer controlled LED Demo

Web Server controlled LED Sketch


[code lang=cpp]
/*
Web Server

A simple web server that shows the value of the analog input pins.
using an Arduino Wiznet Ethernet shield.

Circuit:
* Ethernet shield attached to pins 10, 11, 12, 13
* Analog inputs attached to pins A0 through A5 (optional)

created 18 Dec 2009
by David A. Mellis
modified 9 Apr 2012
by Tom Igoe
modified 15 Nov 2014
by Soohwan Kim
*/

#include <SPI.h>
#include <Ethernet.h>

// Enter a MAC address and IP address for your controller below.
// The IP address will be dependent on your local network:
#if defined(WIZ550io_WITH_MACADDRESS) // Use assigned MAC address of WIZ550io
;
#else
byte mac[] = {0xDE, 0xAD, 0xBE, 0xEF, 0xFE, 0xED};
#endif

//#define __USE_DHCP__

IPAddress ip(192,168,1,20);
IPAddress gateway( 192, 168, 1, 1 );
IPAddress subnet( 255, 255, 255, 0 );
// fill in your Domain Name Server address here:
IPAddress myDns(8, 8, 8, 8); // google puble dns

// Initialize the Ethernet server library
// with the IP address and port you want to use
// (port 80 is default for HTTP):
EthernetServer server(80);
void check_led_status();
// Define the LED PORT NUMBER
#define LED_PORT 53

void setup() {
// Open serial communications and wait for port to open:
Serial.begin(9600);
while (!Serial) {
; // wait for serial port to connect. Needed for Leonardo only
}

// initialize the LED PORT
pinMode(LED_PORT, OUTPUT);
// initaial value is HIGH
digitalWrite(LED_PORT, HIGH);

// initialize the ethernet device
#if defined __USE_DHCP__
#if defined(WIZ550io_WITH_MACADDRESS) // Use assigned MAC address of WIZ550io
Ethernet.begin();
#else
Ethernet.begin(mac);
#endif
#else
#if defined(WIZ550io_WITH_MACADDRESS) // Use assigned MAC address of WIZ550io
Ethernet.begin(ip, myDns, gateway, subnet);
#else
Ethernet.begin(mac, ip, myDns, gateway, subnet);
#endif
#endif

// start the Ethernet connection and the server:
server.begin();
Serial.println("WebServerControlLED");
Serial.print("server is at ");
Serial.println(Ethernet.localIP());
}


void loop() {
// listen for incoming clients
EthernetClient client = server.available();
if (client) {
Serial.println("new client");
// an http request ends with a blank line
boolean currentLineIsBlank = true;
String buffer = ""; // Declare the buffer variable
while (client.connected()) {
if (client.available()) {
char c = client.read();
buffer += c; // Assign to the buffer
Serial.write(c);
// if you've gotten to the end of the line (received a newline
// character) and the line is blank, the http request has ended,
// so you can send a reply
if (c == 'n' && currentLineIsBlank) {
// send a standard http response header
client.println("HTTP/1.1 200 OK");
client.println("Content-Type: text/html");
client.println();
//client.println("<!DOCTYPE HTML>");
client.println("<html>");
client.println("<body>");

// check the LED status
if (digitalRead(LED_PORT)>0){
client.println("LED is <font color='green'>ON</font>");
}else{
client.println("LED is <font color='red'>OFF</font>");
}

// generate the Form
client.println("<br />");
client.println("<FORM method="get" action="/led.cgi">");
client.println("<P> <INPUT type="radio" name="status" value="1">ON");
client.println("<P> <INPUT type="radio" name="status" value="0">OFF");
client.println("<P> <INPUT type="submit" value="Submit"> </FORM>");

client.println("</body>");
client.println("</html>");
break;
}
if (c == 'n') {
// you're starting a new line
currentLineIsBlank = true;
buffer="";
}
else if ( c == 'r') {
//do cgi parser for LED-On
if(buffer.indexOf("GET /led.cgi?status=1")>=0){
// cgi action : LED-On
digitalWrite(LED_PORT, HIGH);
// send web-page
client.println("HTTP/1.1 200 OK");
client.println("Content-Type: text/html");
client.println();
client.println("<html>");
client.println("<body>");
// check the LED status
if (digitalRead(LED_PORT)>0){
client.println("LED is <font color='green'>ON</font>");
}else{
client.println("LED is <font color='red'>OFF</font>");
}
client.println("<br />");
client.println("<a href="/led.htm">Go to control-page</a>");

client.println("</body>");
client.println("</html>");
currentLineIsBlank = false;
break;
}

//do cgi parser for LED-Off
if(buffer.indexOf("GET /led.cgi?status=0")>=0){
// action : LED-Off
digitalWrite(LED_PORT ,LOW);
// send web-page
client.println("HTTP/1.1 200 OK");
client.println("Content-Type: text/html");
client.println();
client.println("<html>");
client.println("<body>");
// check the LED status
if (digitalRead(LED_PORT)>0){
client.println("LED is <font color='green'>ON</font>");
}else{
client.println("LED is <font color='red'>OFF</font>");
}
client.println("<br />");
client.println("<a href="/led.htm">Go to control-page</a>");

client.println("</body>");
client.println("</html>");
currentLineIsBlank = false;
break;
}
}
else{ //if( c != 'r') {
// you've gotten a character on the current line
currentLineIsBlank = false;
}
}
}
// give the web browser time to receive the data
delay(1);
// close the connection:
client.stop();
Serial.println("client disonnected");
}
}
[/code]
Note8 - WebServer controlled LED DEMO.

ArduinoNote List-page
PREVIOUS: Note7 - WebServer controlled LED

Web Server controlled LED Demo


Web Client(Web-browser)를 이용하여 아래와 같이 Web Server(Arduino)에 접속하여 LED Monitoring과 Remote-Control를 해보자


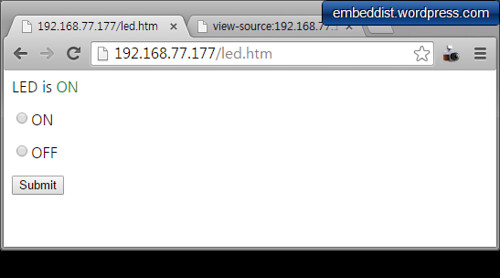
  • Web-browser의 주소란에 Arduino Board의 IP address와 "/index.htm"입력

    192.168.77.177/index.htm (IP address는 Sketch에서 설정한 값을 이용함)


    • index.htm page : LED Status와 Form을 확인 할 수 있다.

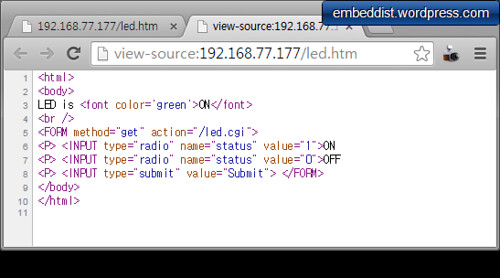
    • index.htm의 Source(HTML)보기: Web-server에서 Generate된 HTML를 확인 할 수 있다.

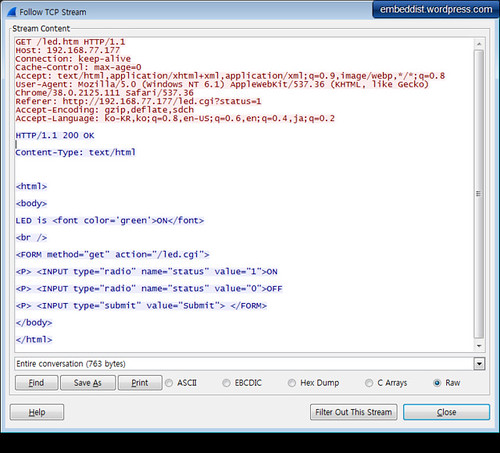
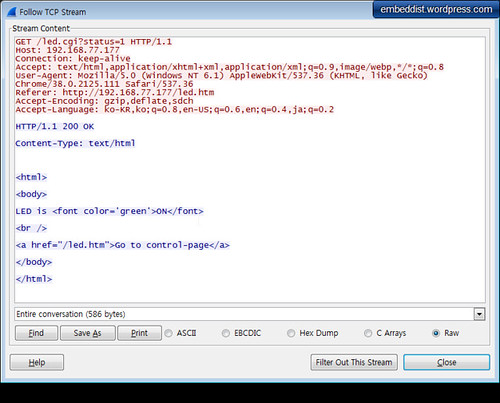
    • index.htm:WireShark를 이용한 Web-server와 Web Client간의 Message교환
      빨간색 : Web-Client가 GET을 이용하여 Web-page를 요청
      파란색 : Web-Server가 "HTTP/1.1 200 OK~"와 Web-page를 Respones함

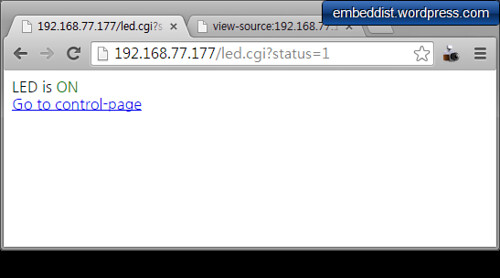
    • LED ON submit Web-page: LED Status와 "led.cgi/status=1"를 확인 할 수 있다.

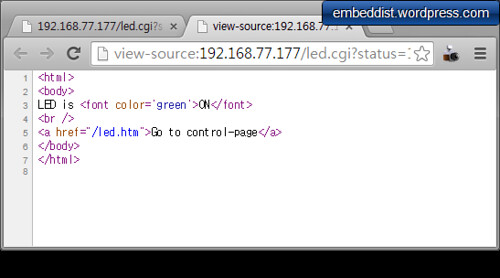
    • LED ON submit Web-page: Source보기

    • LED ON submit Web-page: WireShark를 이용한 Web-server와 Web Client간의 Message교환
      빨간색 : Web-Client가 GET을 "/led.cgi?status=1"를 이용하여 LED ON을 요청
      파란색 : Web-Server가 "HTTP/1.1 200 OK~"와 LED Status를 Respones함


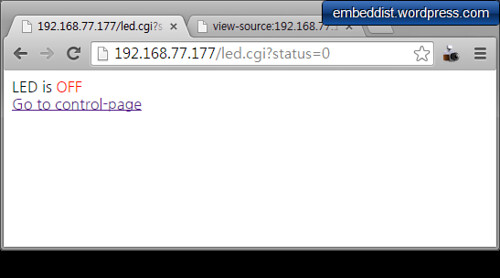
    • LED OFF submit Web-page: LED Status와 "led.cgi/status=1"를 확인 할 수 있다.


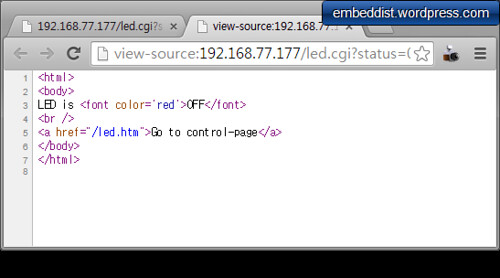
    • LED OFF submit Web-page: Source보기

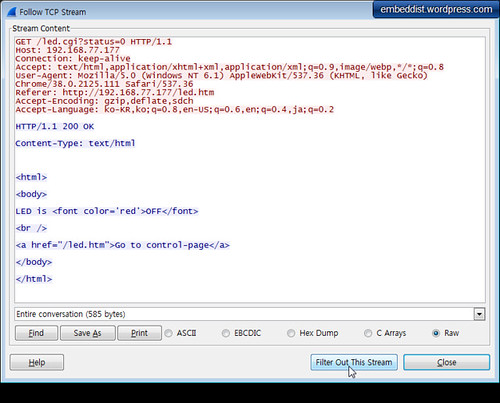
    • LED OFF submit Web-page:WireShark를 이용한 Web-server와 Web Client간의 Message교환
      빨간색 : Web-Client가 GET을 "/led.cgi?status=0"를 이용하여 LED OFF을 요청
      파란색 : Web-Server가 "HTTP/1.1 200 OK~"와 LED Status를 Respones함


  • Link:Wireshark

    "Wireshark is a network protocol analyzer for Unix and Windows"
    쉽게 말해 Packet Capture Program!


NEXT : Note9 - WebServer controlled LED Sketch

Note7 - WebServer controlled LED

ArduinoNote List-page
PREVIOUS: Note6 - WebServer

Hand-on #4: WebServer controlled LED


-Ethernet Shield를 이용한 Remote Control(LED On/Off)과 Monitoring(LED Status)을 함께 해보자

Common Gateway Interface


WWW 서버와 서버 상에서 등장하는 다른 프로그램이나 스크립트와의 인터페이스. 폼을 사용한 메일의 송신이나 게임 등, HTML에서는 불가능한 인터랙티브(interactive)한 요소를 홈페이지에 받아들여 쓸 수 있다.
[네이버 지식백과] CGI [common gateway interface] (컴퓨터인터넷IT용어대사전, 2011.1.20, 일진사)


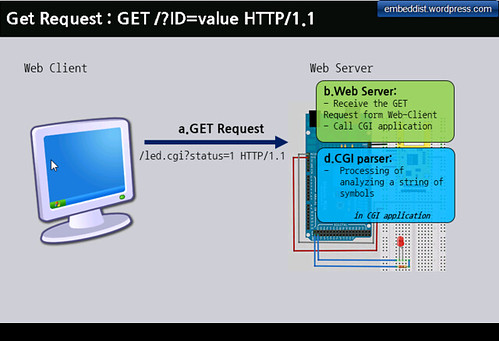
  • Get Request / Receive Req. / CGI parser
    Get Request:cgi


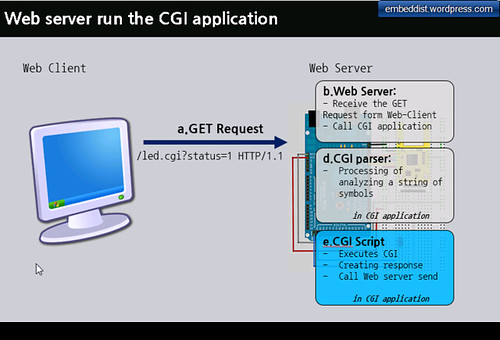
  • Run the CGI App: run CGI scripts
    Run the CGI App.


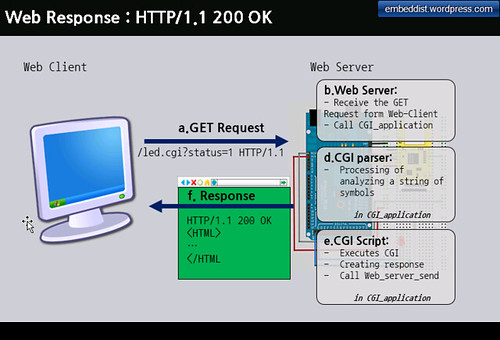
  • Response: call web_server_send from CGI app. and back to Response
    Web Response


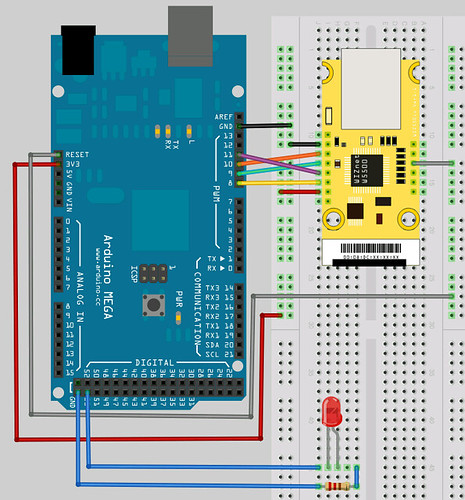
Hardware


Arduino / WIZ550io / LED
* LED를 적절한 포트에 연결한다. 이때, LED에 과전류를 방지하기 위해 저항을 달아준다.

Install Ethenret Library


Network Configuration


Network Configuration


  • Network Configuration on PC side
    Network Configuration
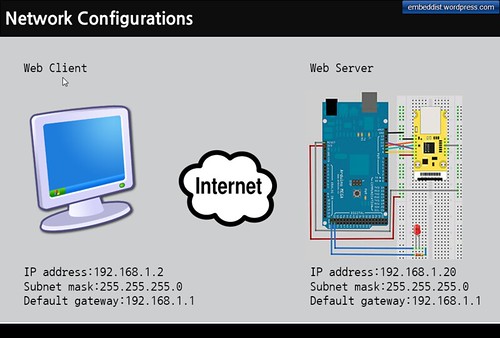
    위와 같이 "Internet Protocol Properies"에서 Network구성을 Test를 위해 아래와 같이 설정해보자
    IP address : 192.168.1.2
    Subnet mask : 255.255.255.0


Default gateway : 192.168.1.1


WebServerControlLED Skeleton


  • Fixed IP address


[code lang=cpp]
//#define __USE_DHCP__

IPAddress ip(192,168,1,20);
IPAddress gateway( 192, 168, 1, 1 );
IPAddress subnet( 255, 255, 255, 0 );
// fill in your Domain Name Server address here:
IPAddress myDns(8, 8, 8, 8); // google puble dns
}
[/code]


  • Port Setting


[code lang=cpp]
// Initialize the Ethernet server library
// with the IP address and port you want to use
// (port 80 is default for HTTP):
EthernetServer server(80);
[/code]


  • setup()


[code lang=cpp]
// Define the LED PORT NUMBER
// ...insert codes... #define LED_PORT XX

void setup() {
// Open serial communications and wait for port to open:
Serial.begin(9600);
while (!Serial) {
; // wait for serial port to connect. Needed for Leonardo only
}


// initialize the LED PORT
// ...insert codes ...
// initaial value is HIGH
// ...insert codes ...


// initialize the ethernet device
#if defined __USE_DHCP__
#if defined(WIZ550io_WITH_MACADDRESS) // Use assigned MAC address of WIZ550io
Ethernet.begin();
#else
Ethernet.begin(mac);
#endif
#else
#if defined(WIZ550io_WITH_MACADDRESS) // Use assigned MAC address of WIZ550io
Ethernet.begin(ip, myDns, gateway, subnet);
#else
Ethernet.begin(mac, ip, myDns, gateway, subnet);
#endif
#endif

// start the Ethernet connection and the server:
server.begin();
// ...insert codes ... Welcome messages
Serial.print("server is at ");
// ...insert codes ... print localIP
}

[/code]


  • loop()


[code lang=cpp]
void loop() {
// listen for incoming clients
EthernetClient client = server.available();
if (client) {
Serial.println("new client");
// an http request ends with a blank line
boolean currentLineIsBlank = true;
String buffer = ""; // Declare the buffer variable
while (client.connected()) {
if (client.available()) {
char c = client.read();
buffer += c; // Assign to the buffer
Serial.write(c);
// if you've gotten to the end of the line (received a newline
// character) and the line is blank, the http request has ended,
// so you can send a reply
if (c == 'n' && currentLineIsBlank) {
// send a standard http response header
client.println("HTTP/1.1 200 OK");
client.println("Content-Type: text/html");
client.println();
//client.println("<!DOCTYPE HTML>");
client.println("<html>");
client.println("<body>");

// check the LED status
// ...insert codes ...

// generate the Form
// ...insert codes ...

client.println("</body>")
client.println("</html>");
break;
}
if (c == 'n') {
// you're starting a new line
currentLineIsBlank = true;
buffer="";
}
else if ( c == 'r') {
//do cgi parser for LED-On
//if(...insert codes ...
// action : LED-On
//digitalWrite(...insert codes ...
// send web-page
client.println("HTTP/1.1 200 OK");
client.println("Content-Type: text/html");
client.println();
client.println("<html>");
client.println("<body>");
// check the LED status
// ...insert codes ...
client.println("<br />");
client.println("<a href="/led.htm">Go to control-page</a>");

client.println("</body>");
client.println("</html>");
currentLineIsBlank = false;
break;
}

//do cgi parser for LED-Off
//if(...insert codes ...
// action : LED-Off
//digitalWrite(...insert codes ...
// send web-page
client.println("HTTP/1.1 200 OK");
client.println("Content-Type: text/html");
client.println();
client.println("<html>");
client.println("<body>");
// check the LED status
// ...insert codes ...
client.println("<br />");
client.println("<a href="/led.htm">Go to control-page</a>");

client.println("</body>");
client.println("</html>");
currentLineIsBlank = false;
break;
}
}
else{ //if( c != 'r') {
// you've gotten a character on the current line
currentLineIsBlank = false;
}
}
}
// give the web browser time to receive the data
delay(1);
// close the connection:
client.stop();
Serial.println("client disonnected");
}
}
[/code]
NEXT : Note8 - WebServer controlled LED Demo